

Zebrafish Flash Stimuli Calibration
The Zebrafish Assay panel provides the user with the option to configure a video recording of Zebrafish (Danio rerio) larvae at a user selectable frame rate for a controlled duration of time.
One key stimuli that can be delivered to the zebrafish is a controlled flash of light. The zebrafish assay panel as of owl version 0.19.23 provides the ability to customize the color of the flash delivered to the zebrafish.
The discussion below provides a brief overview of how one can tune the parameters to obtain a repeatable, calibrated and reproducible assay.
To complete the calibration process, you must have access to a lux meter. Inexepensive digital lux meters are available on Amazon and other online retailers and can be obtained for less than $50.
Calibration procedure
To start the calibration process, set the illumination mode to be “Transmission
IR850” at 50% brightness. This ensures that the flash stimuli’s brightness can
be maximized. To calibrate the system, we will use the Background
Illumination controls to dynamically adjust adjust the settings before
recording them as stimuli.
Place the detector of the lux meter face down on the surface of the diffuser in the center.
With only the IR lights on, the lux meter should read a lux value less than 5 lux.
Set the Lux meter’s range to be able to display values in the thousands. Typically this is denoted by a little
100xmultiplier on the display of the lux meter.Select the color of the flash you desire. Options include
White,Red,Green,BlueandCustom. As a starting point, set the lux to 1000.Note that the hue of
Whiteflash may appear different than what you expect. TheCustomoption allows you control the hue by adjusting the fraction of the red green and blue LED values. Adjust the values of the red, green, and blue intensity as desired.Adjust the LUX until the desired reading on the LUX meter is achieved. Note that the measurement on the lux meter is dependent on the distance between the lux meter and the diffuser. This is true for any diffuse light source.
Repeat steps 5 and 6 until the desired reading is achieved.
The figure below was generated by measuring a few different values of with the setup described above on a typical MCAM at the Ramona Optics facilities.
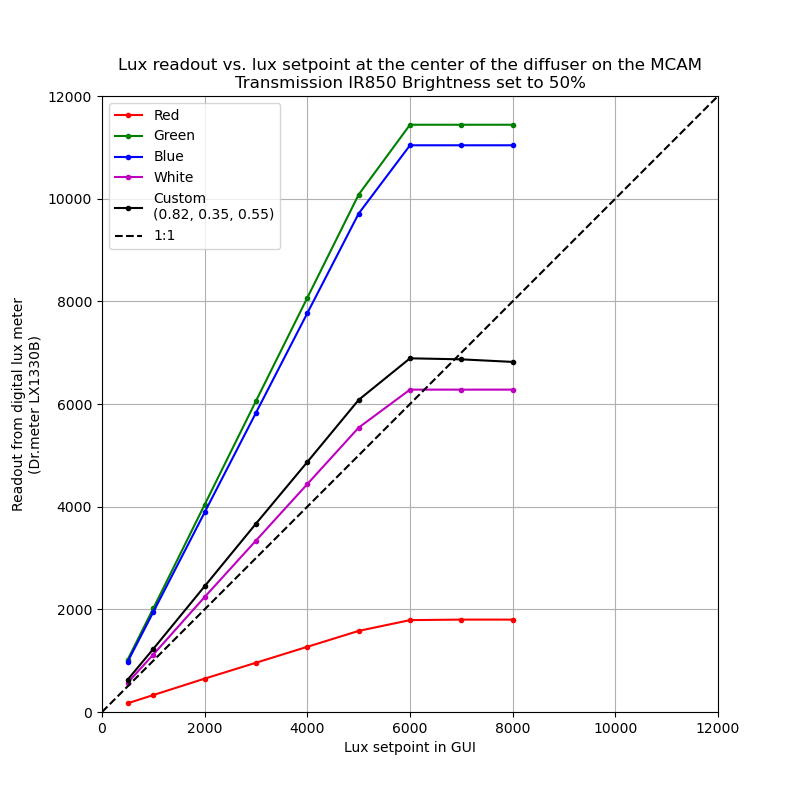
As shown in the figure above, the lux setpoint in the entry box was calibrated
to close to a 1:1 relationship for the measured lux in the White color
dropdown. However users may change to adjust the hue of the flash by selecting
the Custom option (the default values are those of the white setpoint) and
adjusting them ever so slightly.
Once you record your settings, they may be used in the flash stimuli toolbox to programmatically change the values of the illumination throughout the acquisition.