

Acquire a Zebrafish Visual Motor Response (VMR) Dataset
The Zebrafish Visual Motor Response (VMR) is a frequently used assay characterizing behavior during light phase transitions. The Ramona MCAM allows for streamlined acquisition and analysis using a timelapse video acquisition coupled with light phase stimuli.
The following instructions give an example assay setup for running an assay that has 150 seconds background with visible lights on in which images are not acquired followed by 30 seconds of light and 30 seconds of dark recording.
This sequence is repeated 4 times. The duration of each assay segment is 3.5 minutes while only one minute of this time is recorded saving on data sizes and future analysis computation time. Overall, this assay is very similar to running a stimulus video recording but iterated through timelapse mode for multiple acquisitions.
Step |
Function |
|---|---|
1 |
Open the MCAM Software. |
2 |
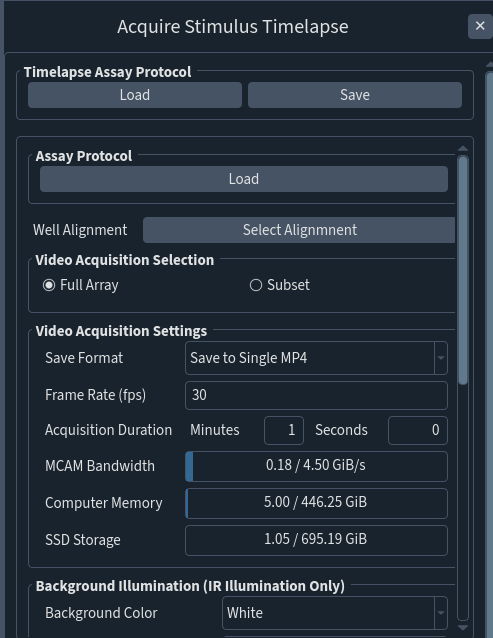
Go to Assays > Zebrafish > Acquire Stimulus Timelapse. |
3 |
Select a Well Alignment File. |
4 |
Set the acquisition framerate. We recommend 30 fps unless tail analysis is required which should likely be run at 160 fps. |
5 |
Set the acquisition duration. Here we use a one minute duration as we would like to record 30 seconds of light and 30 seconds of dark. |
6 |
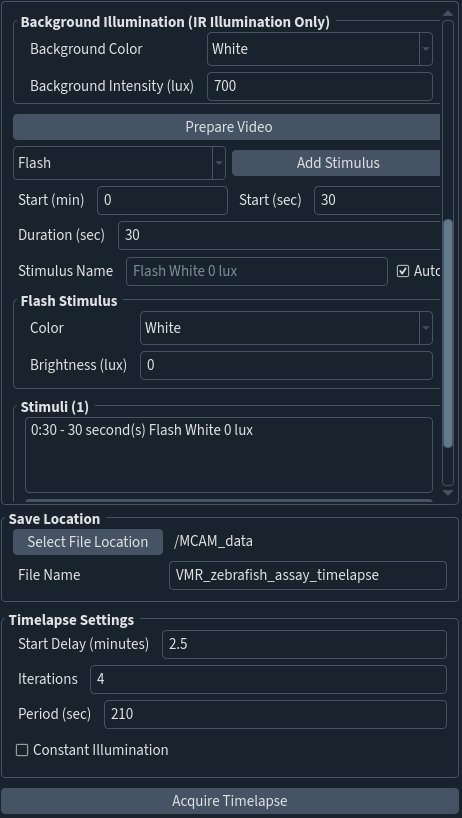
Set the background light intensity. Here we used a value of 700 lux but this value is very specific to each experiment and may change for your experiment. This is the light intensity that will remain on during visible light phases. |
7 |
Add a flash stimulus with 0 lux with 30 second duration that begins at 30 seconds. This will create a dark phase half way through the one minute recording period for thirty seconds. |
8 |
Select a File Location. Always select a folder on the “MCAM_data” drive to store data from MCAM acquisitions. The “File Location” will be displayed in the panel once defined. |
9 |
Define a Filename. This should be a unique identifier to define the dataset. A timestamp will be automatically appended to the chosen name. |
10 |
Under timelapse settings, set a start delay of 2.5 minutes (150 seconds). |
11 |
Set the number of iterations the assay will run. Here we use a value of 4. |
12 |
Set the time lapse period. Here we use a value of 210 seconds (3.5 minutes) which is the total length of one assay segment. |
13 |
Save the time lapse assay protocol by clicking “Save” next to the Assay Protocol field at the top of the panel if this will be a commonly used assay which will save time setting this up again and ensure repeatability of experiments. |
14 |
Start the acquisition by clicking “Acquire Timelapse”. |