

Zebrafish Tail Coiling Assay
Step |
Action |
|---|---|
1 |
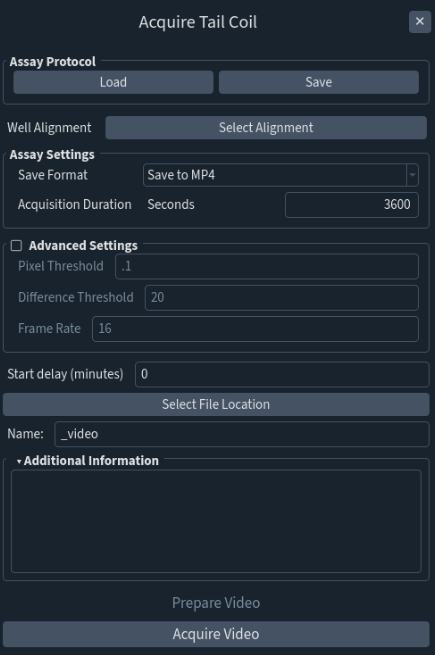
Go to Assays > Zebrafish > Acquire Zebrafish Tail Coil to open the Acquire Tail Coil Panel. Once the Acquire Tail Coil Panel opens, image acquisition settings will automatically adjust to empirically verified optimal values for Tail Coil assays. However, image acquisition settings can still be modified by the user. |
2 |
Click Select Alignment to select a Well Alignment File (see Create a Well Alignment File for more information, and for instructions on creating a Well Alignment File ). The well plate configuration documented within the selected Well Alignment File should match the configuration of the well plate being used in the Tail Coil assay. |
3 |
(Optional) In the Additional Informationfield, enter any notes about the Tail Coil assay being conducted. |
4 |
To save assay data as an .nc dataset file, select Save to RAM under Save Format. To save assay data as an MP4 file, select Save to MP4 under Save Format. To save assay data as a CSV file, select Save to CSV under Save Format. WARNING: This will not save any video data. |
5 |
Assay Settingsopen with preset suggested values. However, to customize assay data capture, under Assay Settings, set duration of Acquisition Duration as per Tail Coil assay experimental requirements. |
6 |
Advanced Settings open with preset suggested values. However, to customize assay data capture, under Advanced Settings, set values of: * Pixel Threshold - threshold to be applied to the absolute difference of pixels between frames relative to the average of the pixels. * Difference Threshold - threshold to be applied to the absolute difference of pixels between frames. * Frame Rate - frame rate the assay will acquire video at. as per Tail Coil assay experimental requirements. |
7 |
Enter a value in the Start Delayfield to delay the start of the assay data capture sequence defined in Steps 5 and 6 above. |
8 |
Click Select File Location to select a workspace. Always select a folder on the “MCAM_data” drive to store data from MCAM acquisitions. The “File Location” will be displayed in the left side panel once defined. |
9 |
Define a Filename to name the folder into which all generated files will be saved. A timestamp will be automatically appended to this name. |
10 |
(Optional) At the top of the panel under “Assay Protocol” click Save to save this assay protocol for future use. In the future, load previously saved assay data capture parameters by clicking the Loadbutton under “Assay Protocol” and select the appropriate Tail Coil Assay JSON file. |
11 |
If Save to Ram was selected as the Save Format, click the Prepare Video button to set up the MCAM system to capture Tail Coil assay video data. |
12 |
Click the Acquire Video button to begin Tail Coil assay data capture. |