

Acquire a Zebrafish Assay Video
Acquiring a zebrafish assay video is an extension of acquiring a video, but with added options for flexible zebrafish assays.
Step |
Function |
|---|---|
1 |
Open the MCAM Software. |
2 |
Go to Assays > Animal Tracking. |
3 |
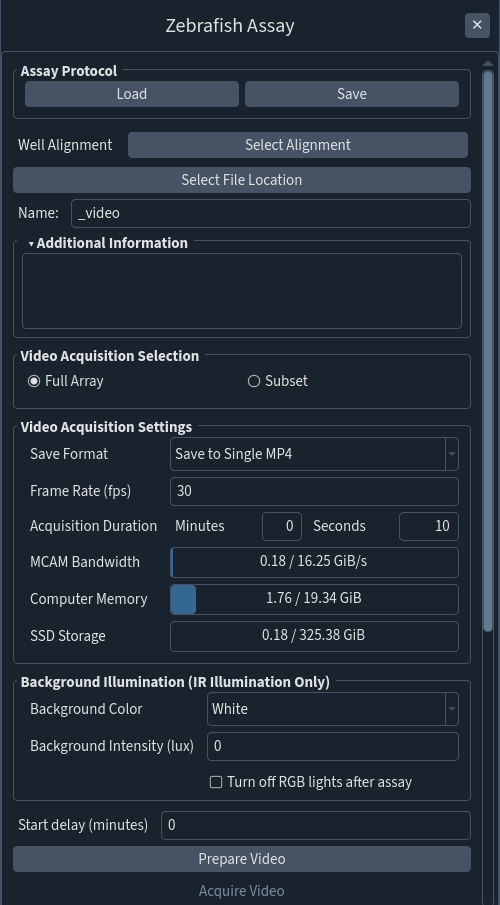
Select a Well Alignment file to identify the well locations. See “Create a Well Alignment File” if you do not have one already. This step is necessary for the analysis if you have chosen “Save to Single MP4”. |
4 |
Select a File Location. Always select a folder on the “MCAM_data” drive to store data from MCAM™ acquisitions. The “File Location” will be displayed in the panel once defined. |
5 |
Define a Filename. This should be a unique identifier to define the dataset. A timestamp will be automatically appended to the chosen name. |
6 |
(Optional)Notes can be added to the “Additional Information” field. |
7 |
Adjust imaging settings in the left side panel to optimize image quality. For behavioral recordings we recommend IR transmission illumination with 60% brightness, 2 millisecond exposure, 2.0 digital gain, and 1.0 analog gain. |
8 |
Select Full Array or Subset to define which cameras are acquiring video. Full array is selected by default. |
9 |
Select a save format for the video acquisition. MP4 is generally recommended as this saves on data sizes and is what is used in the analysis pipeline. |
10 |
In the top left corner of the MCAM™ GUI, select High Frame Rate from the selection menu box. |
11 |
Define Frame Rate. The current (2024/04/12) maximum values for High resolution, Standard and High Frame Rate resolutions are 23, 80, and 160 fps respectively. Acquiring at high frame-rates increases data sizes, so it is recommended to minimize the frame-rate for your application in order to decrease data sizes. For behavioral video acquisitions we recommend using 30 fps for general purpose and longer acquisitions focused on distance traveled metrics and 160 fps for shorter recordings where tail analytics are required. |
12 |
Define the Acquisition Duration. |
13 |
Ensure acquisition requirements are within the MCAM™ capabilities. The three indicator bars representing MCAM™ Bandwidth, Computer Memory, and SSD Storage should be blue. If they are red, this indicates that the workstation cannot run the current settings. |
14 |
(Optional) If background visible light is required, define the background intensity lux value. |
15 |
(Optional) Define a start delay for the experiment. |
16 |
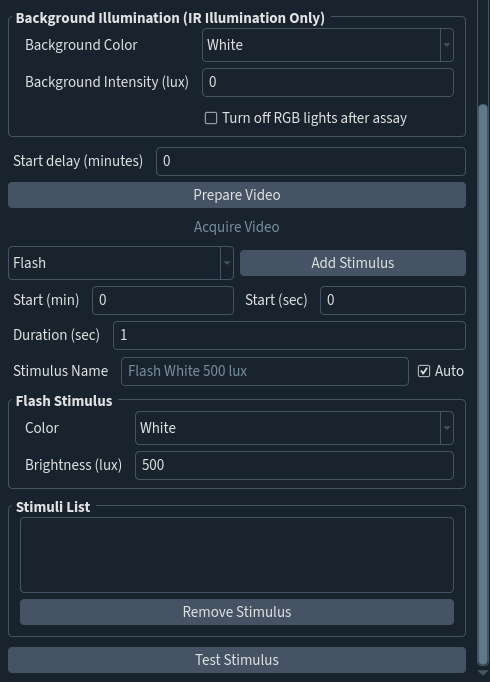
(Optional) Define stimuli. For more information see “Defining Stimuli”. |
17 |
Save the acquisition protocol by clicking “Save” next to the Assay Protocol field at the top of the panel if this will be a commonly used assay which will save time setting this up again and ensure repeatability of experiments. |
18 |
Click Prepare Video. |
19 |
Start the acquisition by clicking “Acquire Video”. |