

Dynamic Visual Display Module
The Dynamic Visual Display module is an LCD screen that can be placed into the Kestrel that enables researchers to present visual stimuli beneath zebrafish. This module is especially useful for behavioral assays testing the Visual Motor Response or the Optokinetic Response, where tracking responses to dynamic stimuli is essential. When paired with Ramona’s Animal Tracking analysis, researchers can gain insight into behaviors like swim patterns or eye movements in response to visual cues. This module is designed for use with the Kestrel in Behavior mode.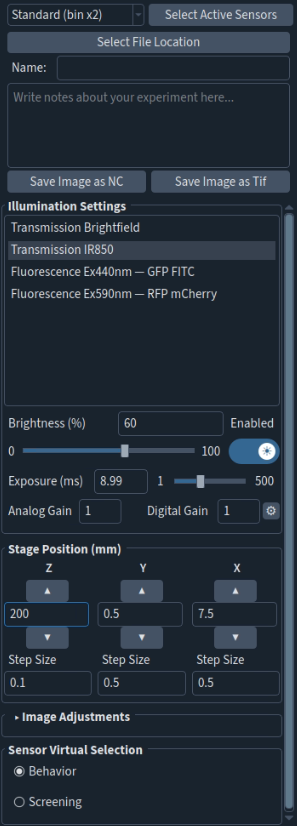
Step |
Action |
|---|---|
1 |
Sample suggestions: Swimming age fish from 4-9 dpf Well plate suggestions: Watson 96 well plates Watson 24 well plates Ramona custom 12 well plates For information about purchasing any of the recommended well plates please email us at orders@ramonaoptics.com. |
2 |
Set Sensor Virtual Selection to Behavior. Ensure that an IR filter unit is in place. Set the stage position to the max height (~200mm on most systems). Set up the Dynamic Visual Display Module as described in MCAM Dynamic Visual Display Module SOP. |
3 |
Video Acquisition Options Option 1: Click Assays > Animal Tracking to open the Animal Tracking Panel. Option 2: Click Zebrafish > Acquire Stimulus Timelapse to collect a timelapse. Once the panels open, set the Illumination Settings to your preferred settings. Suggested settings: IR illumination Brightness 60% Exposure time 9ms Analog gain 1 Digital gain 1 |
4 |
Click Select Alignment to select a Well Alignment File (see Create a Well Alignment File for more information, and for instructions on creating a Well Alignment File). *If saving as an MP4 selecting a Well Alignment during acquisition is necessary to use the Animal Tracking analysis software |
5 |
(Optional) In the Additional Information field, enter any notes about the assay being conducted. Additional Information can not be added later in the viewer software. |
6 |
To save assay data as an .nc dataset file, select Save to RAM under Save Format. To save assay data as an MP4 file, select Save to MP4 under Save Format. |
7 |
Visual stimulus methods for both Video Acquisition Options 1. For a visual stimulus to appear at a specified time during the acquisition, add a flash stimulus of desired lux to your desired time Start (min) or Start (sec) 2. For a visual stimulus to appear for the duration of the acquisition, set the Background Illumination to your desired lux |
8 |
Enter a value in the Start Delay field to delay the start of the assay data capture sequence. |
9 |
Click Select File Location to select a workspace. Always select a folder on the MCAM_data drive to store data from acquisitions. The “File Location” will be displayed in the left side panel once defined. |
10 |
Ensure that the your visual display is loaded on the provided chromebook |
11 |
Option 1 (Animal Tracking): Click Acquire Video to begin video capture Option 2 (Acquire Stimulus Timelapse): Click Acquire Timelapse to begin video capture |
12 |
(Optional) At the top of the panel under “Assay Protocol” click Save to save this assay protocol for future use. In the future, load previously saved assay data capture parameters by clicking the Load button under “Assay Protocol” and select the appropriate Assay JSON file. |