

Acquire a Zebrafish Timelapse Stimulus Dataset for Acoustic Startle Response
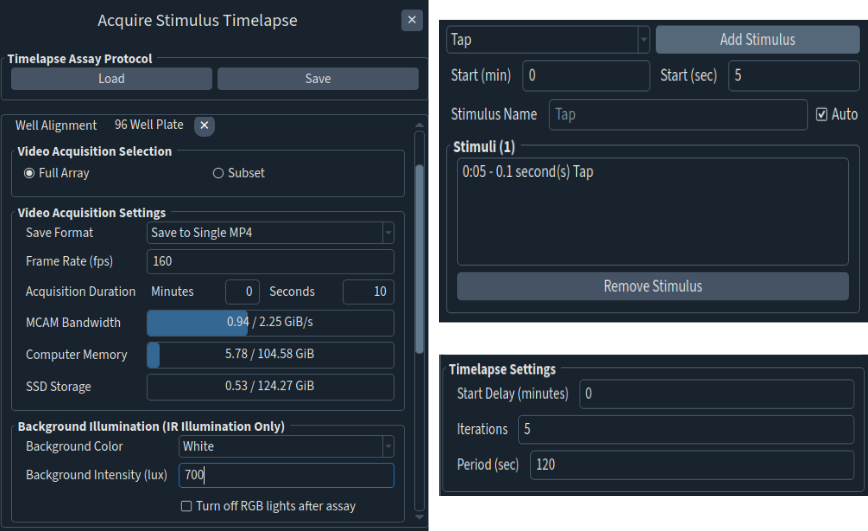
The following instructions give an example of assay setup for quantifying acoustic stimulus responses in larval zebrafish. This protocol is used to take successive short recordings with a tap stimulus in the middle of each recording.
Step |
Function |
|---|---|
1 |
Open the MCAM Software. |
2 |
Go to Advanced > Additional Settings > Image Sensor. Choose 2048 x 2048 pixels as the image size. This is the best setting if you are using 24- or 96-well plates because the field of view sees all of each well and allows the cameras to capture frames at high frame rate. |
3 |
Select High Frame Rate for imaging mode in the top left corner of the screen. |
4 |
Go to Assays > Zebrafish > Acquire Stimulus Timelapse. |
5 |
Select a Well Alignment File. |
6 |
Set the background light intensity. Here we used a value of 700 lux but this value is very specific to each experiment and may change for your experiment. We recommend using the same intensity as the larvae were raised at. |
7 |
Set the acquisition framerate. For acoustic response tracking, we recommend 160 fps to capture high frequency movements. |
8 |
Set the acquisition duration to a 10 seconds duration. |
9 |
Select “Tap” in the stimulus drop down menu. Set Start (sec) to 5. Then, click “Add Stimulus” to add the stimulus to the stimulus list. These settings make the tap stimulus happen right in the middle of your recording. |
10 |
Set the number of iterations the assay will run under timelapse settings. Here we use a value of 5. |
11 |
Set the time lapse period to 120 seconds (2 minutes) to ensure that zebrafish do not habituate to the stimulus. |
12 |
Save the timelapse assay protocol by clicking “Save” next to the Assay Protocol field at the top of the panel if this will be a commonly used assay which will save time setting this up again and ensure repeatability of experiments. |
13 |
Select a File Location. Always select a folder on the MCAM_data drive to store data from MCAM acquisitions. The “File Location” will be displayed in the panel once defined. |
14 |
Start the acquisition by clicking “Acquire Timelapse”. |