15. Troubleshooting
If you have any questions regarding the usage of the MCAM, please contact Ramona by email at help@ramonaoptics.com.
We find it very helpful if you can include as much description of your issue as possible. Screenshots, pictures of your setup, a script, or sample data to better demonstrate the issue at hand, will help our team better assist you in answering your questions.
Within your message please include the output of the terminal command:
mcam_list
Tips
The tips below may help you understand certain common challenges that other users have reported and how to overcome them.
Cannot connect to the MCAM
If you are unable to connect to the MCAM, first identify which of the 3 cables are used in your particular system to connect between the MCAM and the computer. A picture of each cable is shown below from left to right:
A single Thunderbolt cable between the MCAM and the computer.
One, two, or four Mini-SAS Cables between the MCAM and the computer.
A PCIe ribbon cable between the MCAM and the computer.
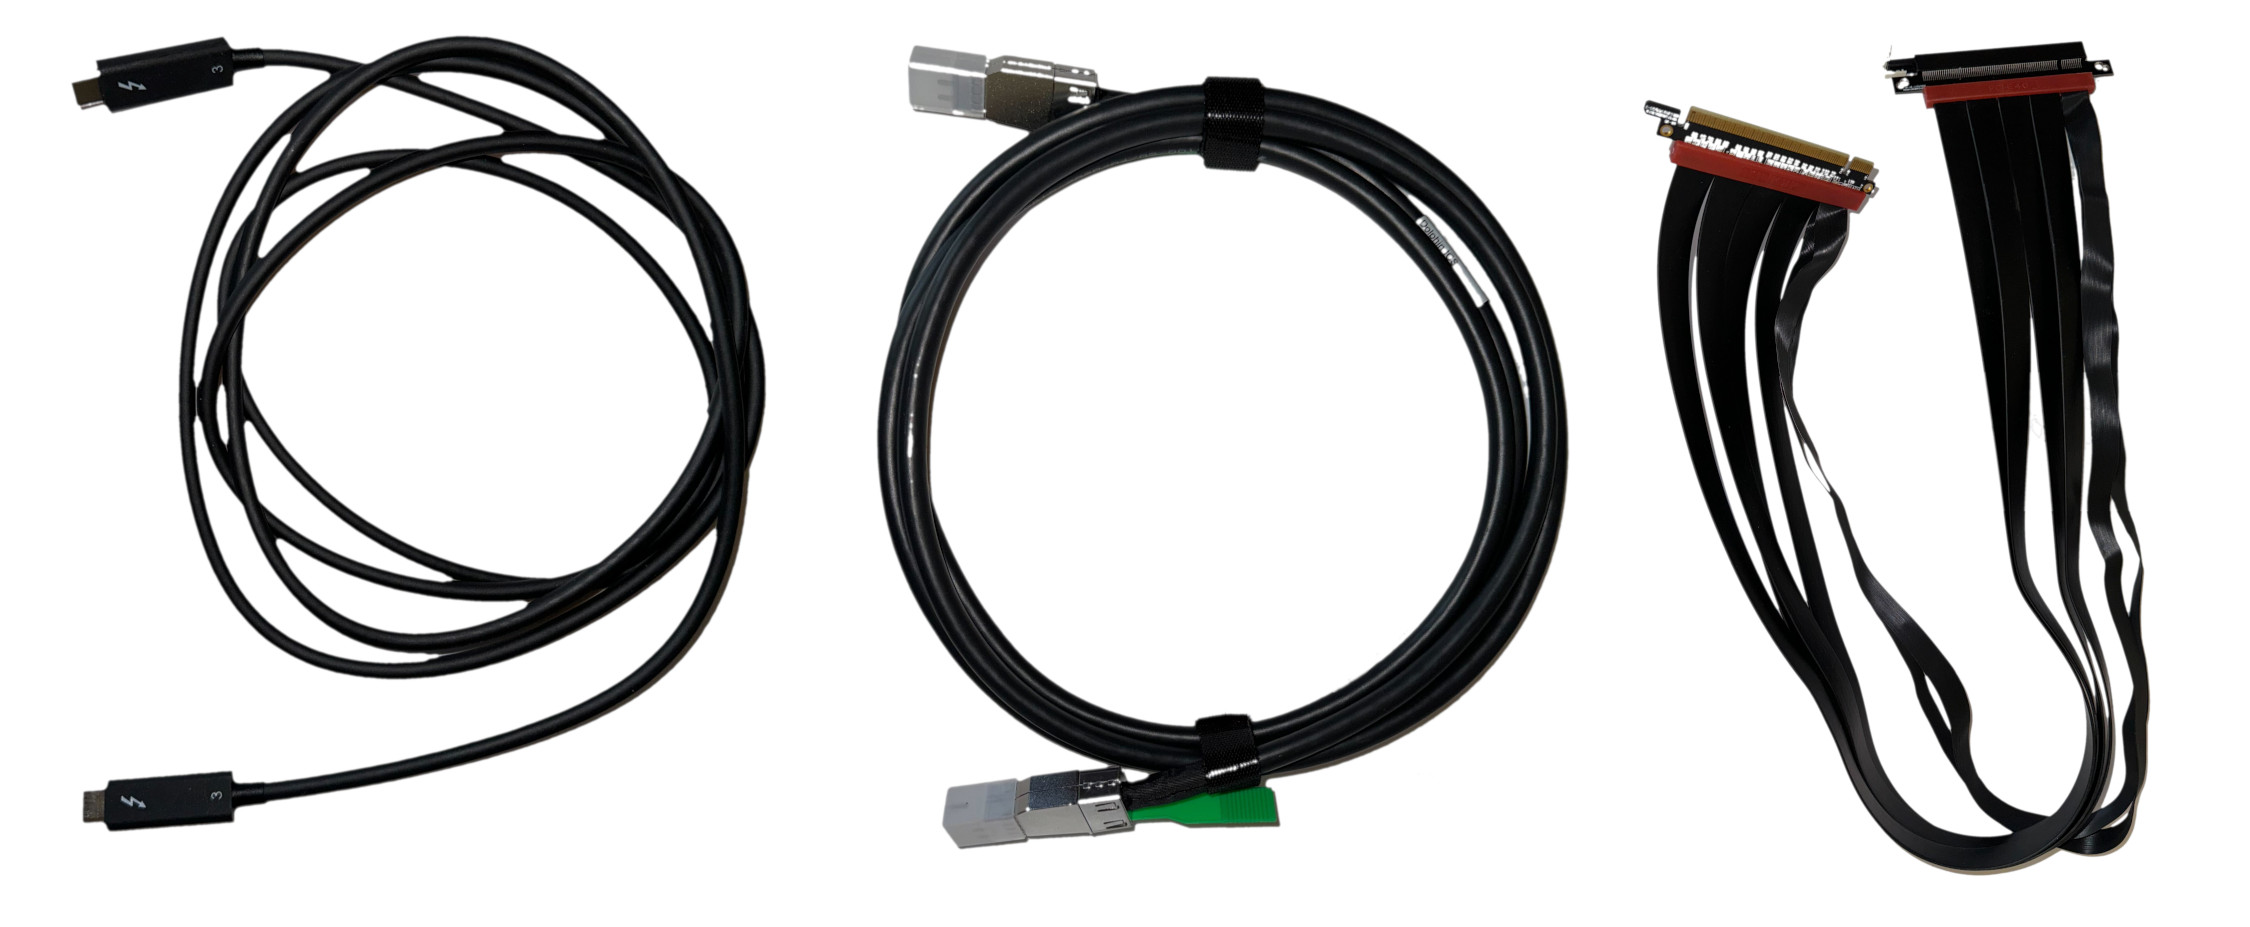
The different cable options between the MCAM and the computer.
Depending on which is used in your system, you will have to follow the different troubleshooting steps below.
Thunderbolt Cable Connection
If you are using a Thunderbolt cable, first check that the Thunderbolt driver is correctly installed.
Go to the System Settings and click on Thunderbolt. You should see a screen like the one below:
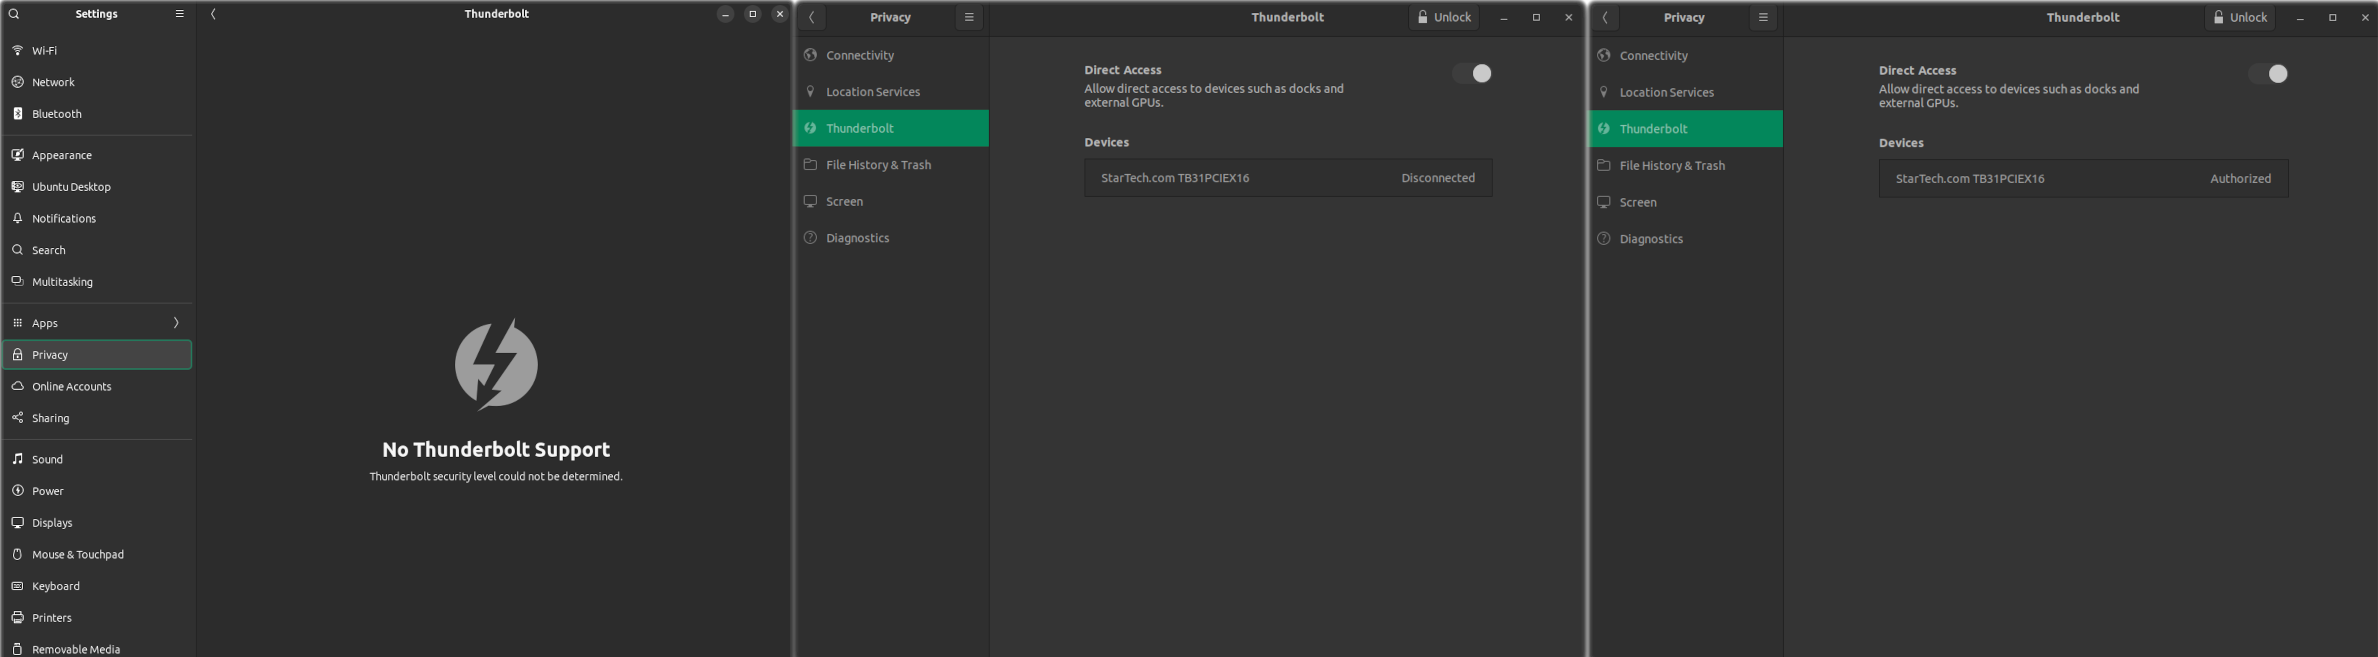
Thunderbolt Settings under different conditions. Left: Thunderbolt driver not correctly loaded. Middle: Thunderbolt driver correctly loaded, but MCAM not connected. Right: Thunderbolt driver correctly loaded, and MCAM connected.
The figure shows the Thunderbolt settings under different conditions.
The Thunderbolt driver is not correctly initialized by the operating system.
The Thunderbolt driver is correctly initialized by the operating system, but the MCAM is not connected.
The Thunderbolt driver is correctly initialized by the operating system, and the MCAM is connected.
If you see the figure on the left where the Thunderbolt driver is not correctly loaded, you will need to follow the system startup procedure outlined below. If you see the figure in the middle, please check that the Thunderbolt cable is connected both on the MCAM, and on the computer side. If you see the figure on the right hand side, please check to ensure that the MCAM is not connected by any other application.
If the Thunderbolt driver is not correctly loaded by the operating system, please follow the procedure outlined below to get the system to startup correctly.
Power off the MCAM using the switch on the back of the device.
Power off the computer using the shutdown button on the user interface.
Once the computer is powered off, use the switch on the back of the computer to fully power off the computer. (This step is very important.)
Wait 20 seconds.
Keep the MCAM Off. Power on the computer by first toggling the switch on the back of the computer, then pressing the power button on the front of the case.
Check that Thunderbolt is detected by navigating to the Thunderbolt system settings.
Turn on the MCAM by using the switch on the back of the device.
Verify that the MCAM is detected by observing the Thunderbolt system settings.
Start the MCAM application.
If you still have trouble connecting to the MCAM, please do not hesitate to contact Ramona Optics at help@ramonaoptics.com.
Mini-SAS Cable Connection
The Mini-SAS cable connection enables the MCAM to communicate with the computer at the highest possible speeds. However, it is critical that the cables are connected in the correct order. The figure below shows the correct order of the cables on the MCAM side, and on the computer side.
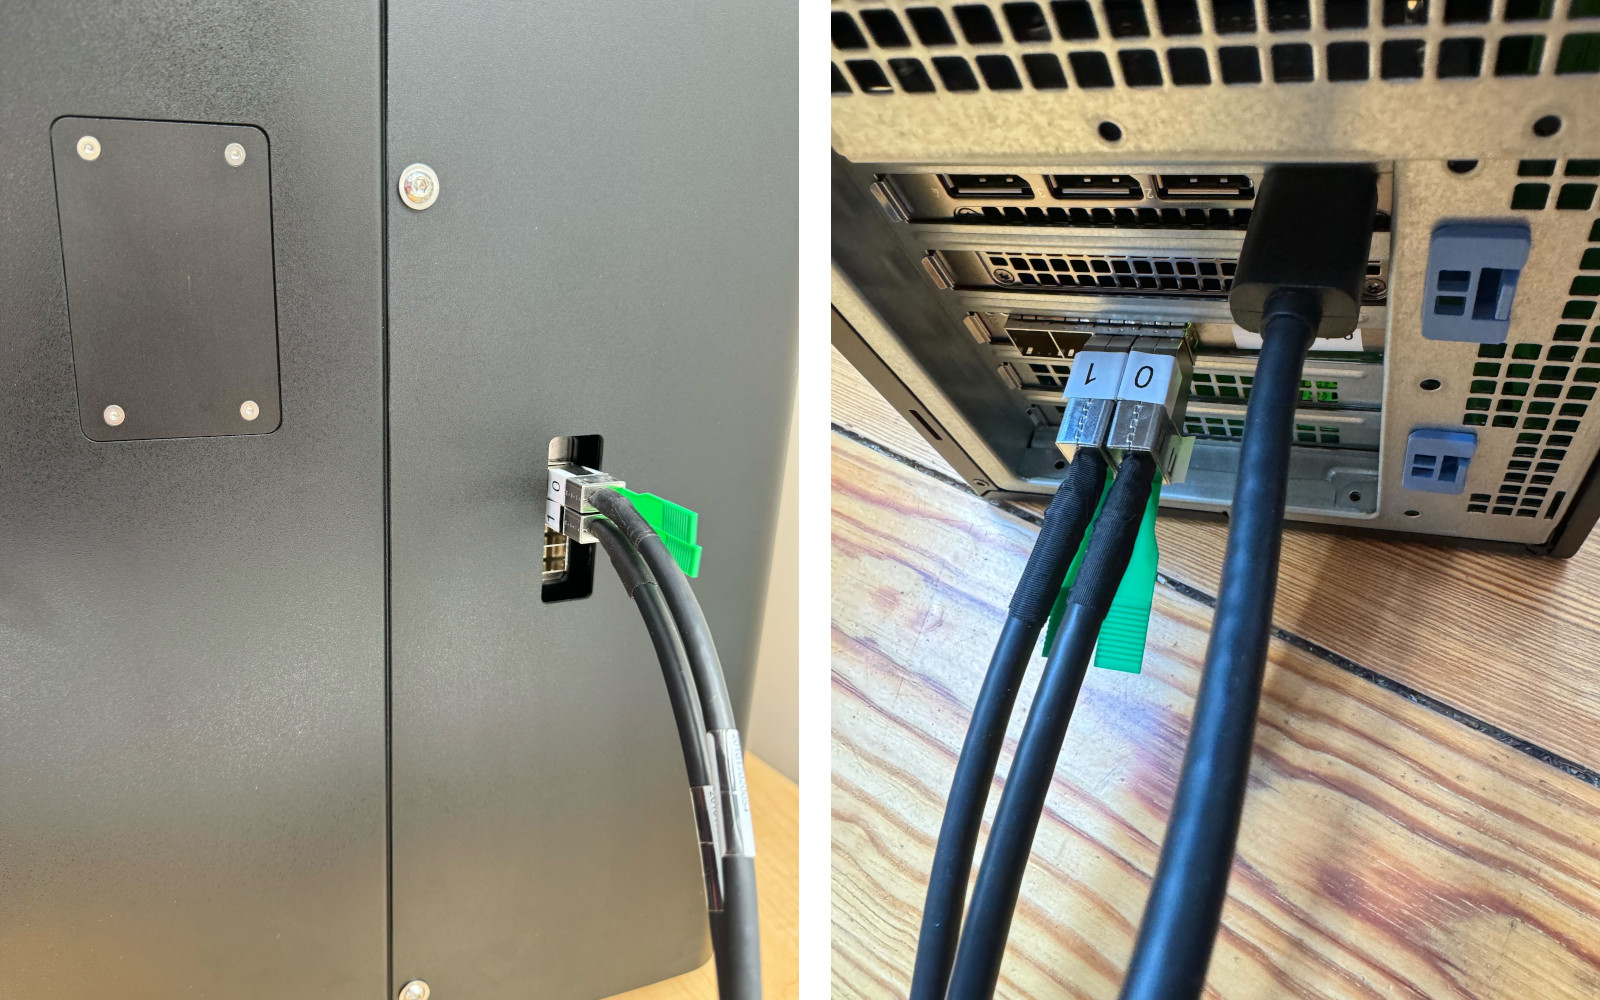
The MCAM on the left, and the computer on the right connected with two Mini-SAS cables in the correct order.
Important, when removing the Mini-SAS cables, only pullon the green tabs. Do not pull on the cables themselves. Pulling on the green tabs will release a retention clip which will enable the cables to be removed from the MCAM and computer.
Power off the MCAM by using the switch on the back of the device.
Power off the computer using the shutdown procedure on the operating system interface.
Use the switch on the back of the MCAM computer to fully power off the computer. If there is no switch, disconnect the power from the computer by removing the outlet power cable from the computer.
Wait 20 seconds.
Verify that the cable in the “0” position of the MCAM (as shown in the figure above) is connected to the computer in the “0” position.
If two cables were provided with your system, verify that the cable in the “1” position of the MCAM (as shown in the figure above) is connected to the computer in the “1” position.
If four cables were provided with your system, verify that the cable in the “2” position of the MCAM (as shown in the figure above) is connected to the computer in the “2” position.
If four cables were provided with your system, verify that the cable in the “3” position of the MCAM (as shown in the figure above) is connected to the computer in the “3” position.
Power on the MCAM first.
Connect the power cable to the computer.
If the computer has a power switch on the back, ensure it is in the “on” position.
Wait 20 seconds.
Power on the computer by pressing the power button on the front of the computer.
Wait until the computer has finished its startup procedure, then start the MCAM application.
If you still have trouble connecting to the MCAM, please do not hesitate to contact Ramona Optics at help@ramonaoptics.com.
Python 3.9 and 3.10 End of Life
On Dec 3rd 2023, we decided to no longer provide updates to our software for users of Python 3.9 (Last Version is 0.18.357). On March 2025, we decided to no longer provide updates to our software for users of Python 3.10 (last version is 0.19.217).
Because of the details of how the MCAM software is installed, users of Python 3.9 or 3.10 are encouraged to contact Ramona Optics at help@ramonaoptics.com prior to attempting to follow these instructions on their own.
To upgrade to Python 3.12, please follow the instructions below:
Ensure that you are presently using Python 3.9 in your installation. Open a terminal and type the following command:
mcam_listYou should expect to see an output like the following for Python 3.9
------------------------  --------------------------------------------------------------------------
owl_version               0.18.340
python_version            3.9.16 | packaged by Ramona Optics | (main, Feb  5 2023, 16:10:08)
                          [GCC 11.3.0]
sys_executable            /home/ramona/falcongui/bin/python3.9
sys_exec_prefix           /home/ramona/falcongui
xdg_session_type          x11
------------------------  --------------------------------------------------------------------------
Or the following for installations based on Python 3.10.
------------------------  --------------------------------------------------------------------------
owl_version               0.19.217
python_version            3.10 | packaged by Ramona Optics
sys_executable            /home/ramona/falcongui/bin/python3.10
sys_exec_prefix           /home/ramona/falcongui
xdg_session_type          x11
------------------------  --------------------------------------------------------------------------
Create an backup of the folder
/home/ramona/falconguiusing the commandtar -czfv falcongui_$(date +%Y%m%d_%H%M%S)_backup.tar.gz ${HOME}/falcongui
Update to the last supported version of owl-base for Python 3.9:
if [[ $(python --version) == 3.9.* ]] then mamba install "owl-base>=0.18.357"; else mamba install "owl-base>=0.19.217"; fi
Use the
mcam_listcommand to identify and cleanup any remaining packages that are no longer needed:mcam_list
If any cleanup is suggested, the
mcam_listwill provide you with a list of recommendations.Install python 3.12 in the conda environment along with the latest version of owl-base:
mamba install python=3.12 "owl-base>=0.19.530"
Ubuntu and Linux Kernel Compatibility
As of May 2025, the MCAM is validated for compatibility with Linux kernel versions between version 5.15 and 6.11 and Ubuntu 20.04, 22.04 and 24.04. However, because Ubuntu 20.04 is now considered end of life, we recommend that users update to Ubuntu 24.04.
Warnings about CUDA Less than version 12
If you are seeing warnings about having CUDA version 11.2 or 11.8 installed, then please following the following instructions.
Close the MCAM Software and save all your files. Leave the MCAM powered on.
Open a terminal and update all the ubuntu software.
sudo apt update
sudo apt upgrade --yes
Install the latest recommended version of the NVidia driver, 535.
sudo apt purge *nvidia*
sudo apt install nvidia-driver-535
Ensure the MCAM device is turned on. Reboot the MCAM computer.
Once the MCAM Computer has started again, open a terminal and use the following command to remove the old cuda version
mamba uninstall cuda-version cudatoolkit
Update the MCAM software to the latest version.
mamba update --all
Install the latest version of the CUDA enabled packages
mamba install cuda-version=12 owl-zebrafish cupy
Error that a GPU could not be found

If you are seeing an error that a GPU could not be found it is likely that you have a version conflict, please follow the following instructions. First close the MCAM software. Then launch a terminal and type the following command:
mcam_list
This will provide you with an assortment of information about your current installation. Scroll to the bottom and see if there is a warning about CUDA being less than version 12. If so please follow the instructions above to update your CUDA version. If you do not see this warning, or you continue to see the error, update tensorflow and tensorflow-gpu to the latest version with the following command:
mamba update tensorflow
If you continue to have issues with this, please contact Ramona Optics.
Missing MCAM Desktop Icons
If the MCAM application icons have disappeared from your Ubuntu desktop or favorites bar, you can easily restore them by following these steps:
Click on the “Activities” button in the top-left corner of your screen, or press the Super key (Windows key).
In the search bar that appears, type “mcam” to search for MCAM applications.
You should see the MCAM applications appear in the search results. Right-click on the MCAM application icon you want to restore.
From the context menu that appears, select “Add to Favorites”.
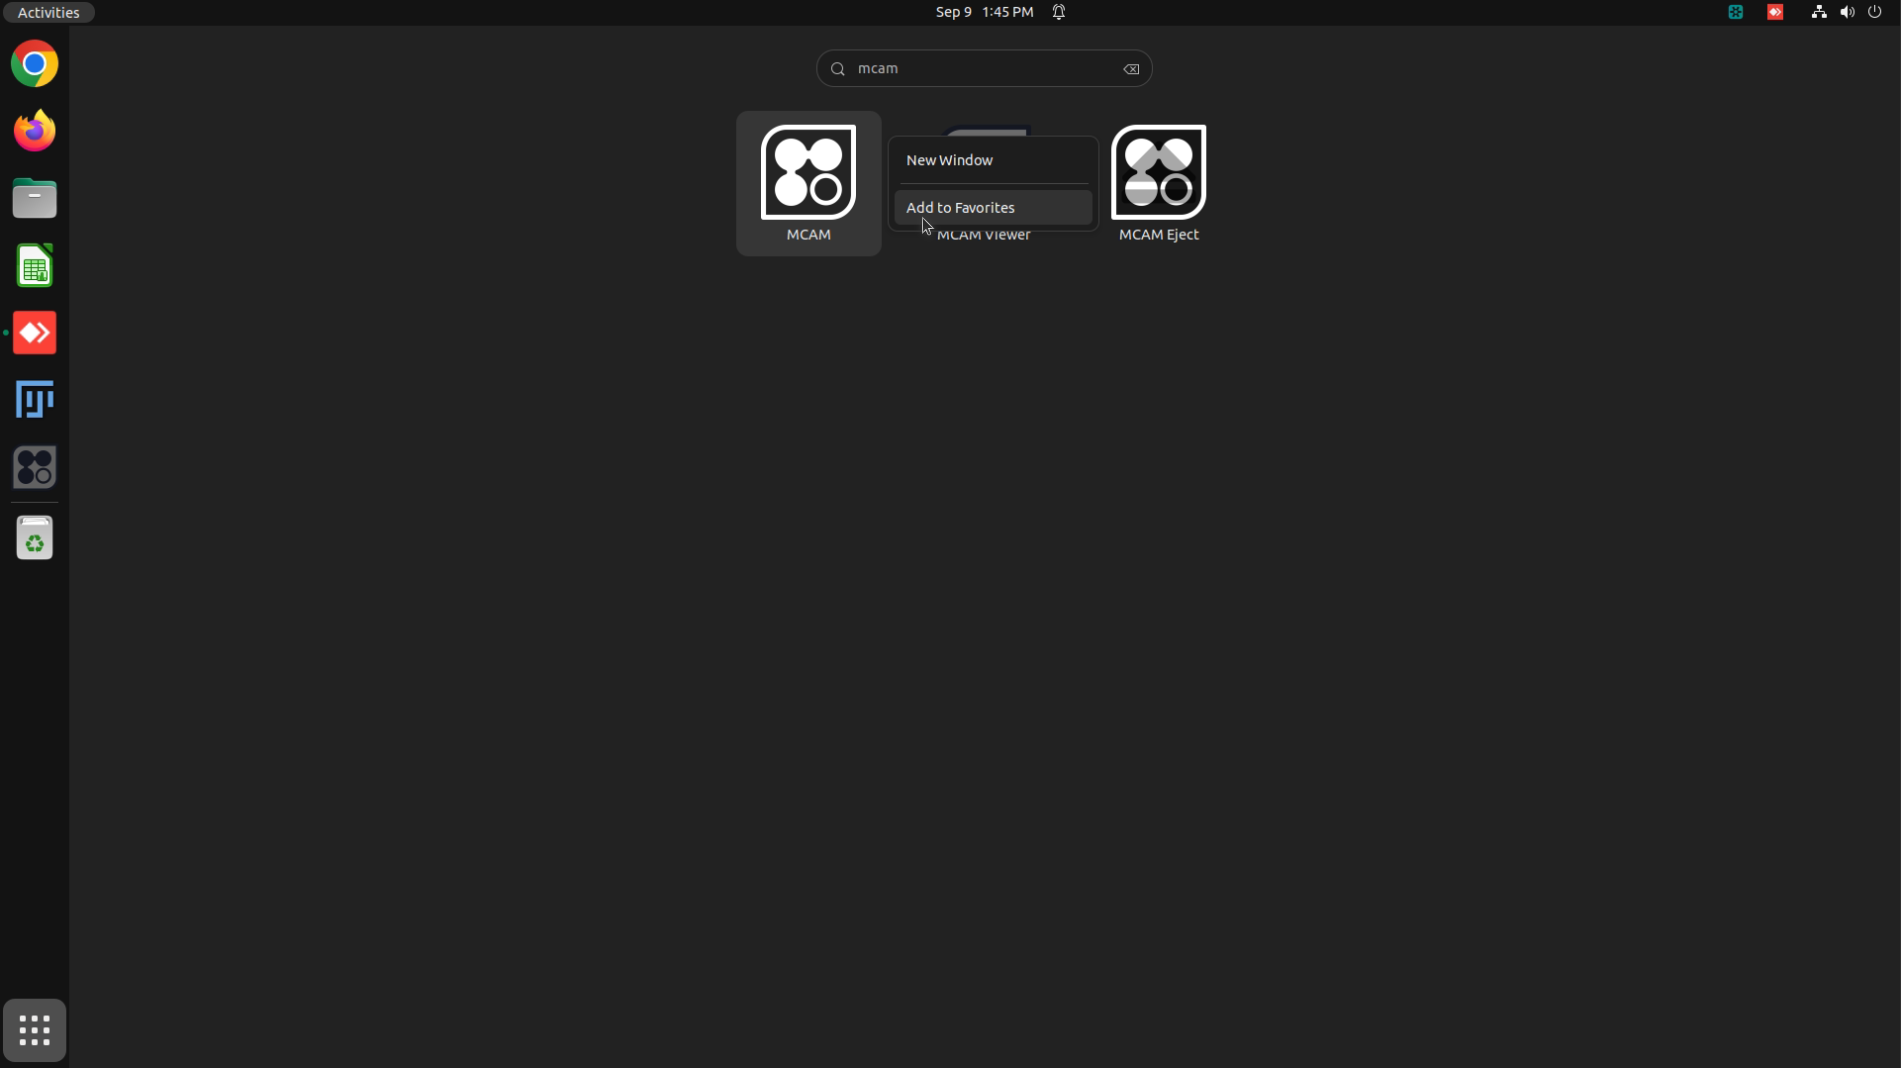
Adding MCAM Acquisition to favorites from the Activities search.
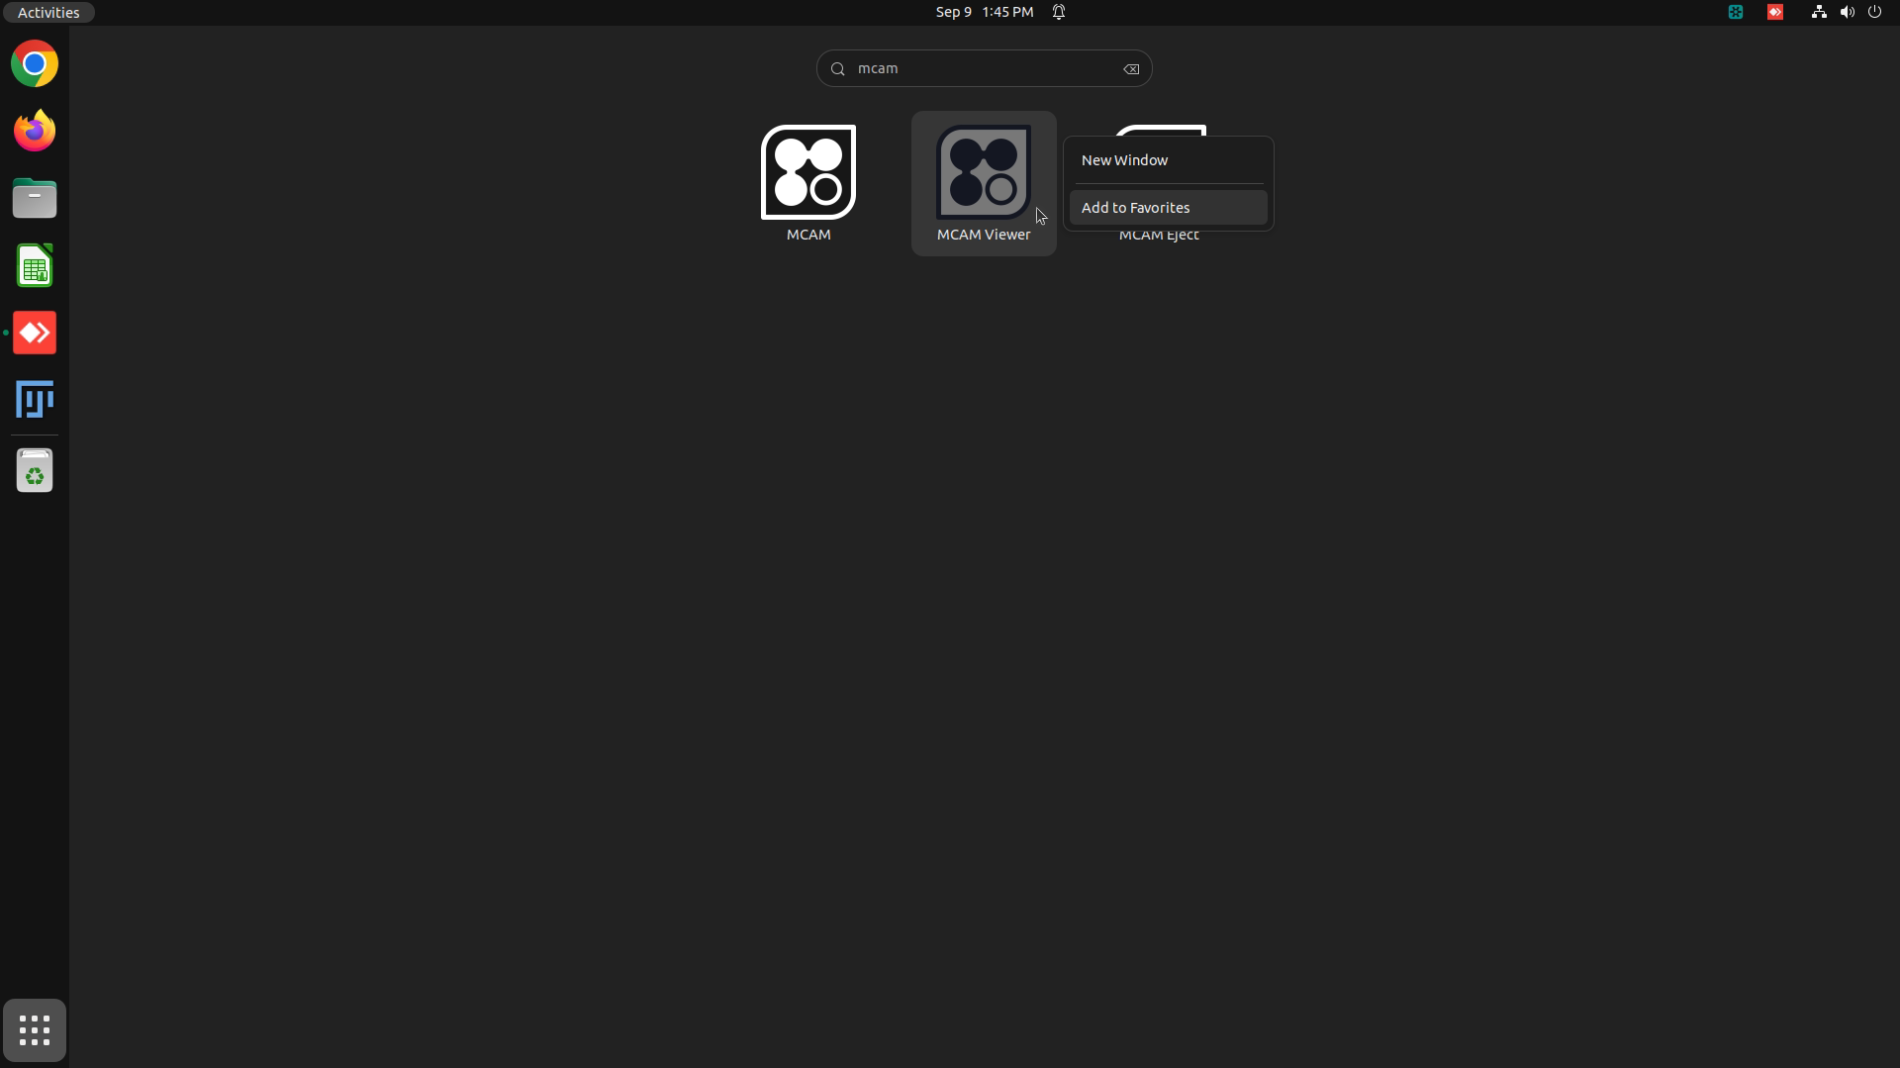
Adding MCAM Viewer to favorites from the Activities search.
The MCAM application icon will now appear in your favorites bar on the left side of the screen.
Inability to update past version 0.18.220
If you find yourself unable to update past version 0.18.220 with the command suggested above due to errors that are seemingly related to jpeg, we suggest following the following guide
Verify that you have installed a version of owl older than 0.18.220 and jpeg version 9e. Open a terminal and type the following command:
mamba list | grep "^owl\|^jpeg"
You should expect to see an output like:
jpeg                      9e                   h0b41bf4_3    conda-forge
owl-base                  0.18.220        py310h6cd0baa_0    ramonaoptics
owl-falcon_gui            0.18.220                py310_0    ramonaoptics
owl-mcam_viewer           0.18.220                py310_0    ramonaoptics
Here we can confirm that we are using owl version 0.18.220 and jpeg 9e.
Backup your whole MCAM Installation. This is typically achieved by rightlicking on the folder
/home/ramona/falconguiand compressing it into a zip file.Forcibly uninstall jpeg version 9e, and install updated versions of packages:
conda uninstall --force --offline jpeg
mamba install "owl-base>=0.18.221"
mamba update --all
Verify that new versions have been installed along with jpeg turbo version 9e. Open a terminal and type the following command:
mamba list | grep "^owl\|^jpeg"
And verify that updated versions of owl (beyond 0.18.220) and
jpegturbois installed.If you continue to have issues with this, please contact Ramona Optics.