11. Knowledge Base
One common pitfall of using the MCAM is good data management. Each raw image from the MCAM can be as large as 700 MegaBytes and came be acquired up to 5 times per second. A 5 minute recording session can be as large as 1 TB.
MCAM™ Behavior Mode Video Acquisition Best Practices
Multiple video acquisition modes exist within the Ramona Optics MCAM™ and choosing the best method for your application will ensure that data is acquired efficiently to streamline your workflow. The quantity of data streaming through the MCAM™ is extremely high and we need to consider multiple factors including the workstation hardware such as the central processing unit (CPU), random access memory (RAM), solid state drive (SSD) and graphics processing unit (GPU) to ensure that data is successfully processed and saved but additionally the parameters of the camera sensors that sense the data such as resolution, binning, and number of color channels.
First we need to consider the camera sensor size that we are acquiring data from. Specifically, for use with imaging a 96-well plate we recommend 2048x2048 images while for a 24-well plate we recommend a 3072x3072 sensor size. These sensor shapes will ensure that each camera sees four wells of a 96-well plate or one well of a 24-well plate.
Within the video acquisition panels of the MCAM™ user interface three save formats exist, Save to Single MP4, Save to RAM, and Save to Disk. Some details about each of these imaging modes are listed below. We are attempting to maximize frame rate in behavior mode acquisitions, so here we will only consider acquisitions using high frame rate mode.
Save to Single MP4
With this acquisition mode, videos are streamed and compressed to MP4 format to save data space both temporarily in system RAM but also in the final saved file. Data is saved in parallel to data acquisition. This is the recommended acquisition mode for most video acquisitions however we are limited by the rate that the datastream can be compressed by the GPU encoder. Currently the maximum frame rate for this acquisition mode is
60 fps for 2048x2048 sensor size.
30 fps for 3072x3072 sensor size.
Save to Uncompressed NC:
In this acquisition mode data is streamed to RAM and once the entire video has been acquired it is then saved to the SSD in a second step. This mode allows for higher frame rate acquisitions and data is saved in a raw (.NC) file format. Maximum frame rates in this mode are
160 fps for a 96-well plate at 2048x2048.
120 fps for a 24-well plate at 3072x3072.
Duration of these recordings is limited by the quantity of RAM in your MCAM™ workstation. Please note that to use these videos with tracking workflows, the raw NC video files need to be compressed to MP4 format before they enter the tracking pipeline (See Compressing NC Datasets in the MCAM Workflow Manual).
Save to Disk
In this acquisition mode data is streamed through the workstation RAM and saved directly to the SSD. We do not recommend using this save mode because it does not efficiently use system RAM and may put extra strain on the SSD, however we have left it as an option to allow for longer duration recordings. Maximum frame rates in this mode are
160 fps for a 96-well plate at 2048x2048.
120 fps for a 24-well plate at 3072x3072.
Duration of these recordings is limited by the SSD capacity in your MCAM™ workstation. Please note that to use these videos with tracking workflows, the raw NC video files need to be compressed to MP4 format before they enter the tracking pipeline (See Compressing NC Datasets in the MCAM Workflow Manual).
SSDs Choice
While many solid state drives (SSDs) have very fast read speeds, often they fail at the sustained writing tasks that are required by the MCAM.
It may be desirable to install a new SSD into the MCAM for increased storage, or for increased performance. Always contact your Ramona Optics representative before making any changes to the MCAM computer to ensure that the changes are compatible with your workflows.
We strongly encourage the use of the following two NVMe SSDs:
Kioxia CD8, CD7, or CD6-R (up to 15 TB). Sustained write speeds up to 2-3 GB/s.
The Samsung 990 Pro or 970 Pro SSD (up to 1-4TB). Sustained write speeds of 1-2 GB/s.
We strongly encourage the use of NVMe SSDs. However, even many expensive NVMe SSDs start to slowdown under sustained workloads. When formatting an SSD, we recommend leaving the following partition sizes for the following SSD sizes:
A 1 TB SSD should be formatted to a 750 GB partition.
A 4 TB SSDs should be formatted to a 3.25 TB partition.
A 7-8 TB SSD formatted to a 4 TB partition.
A 14-16 TB SSD formatted to a 8 TB partition.
The addition space on the SSD is used by the SSD firmware to ensure that the fast write speeds are maintained during data acquisition.
Installing a new SSD
If you are replacing your old SSD you will first need to remove its settings from your computer. See our instructions [1] on how to do this.
To format the SSDs, open the Ubuntu disks utility by searching for Disks in the application overview.
Open the ubuntu disks utility
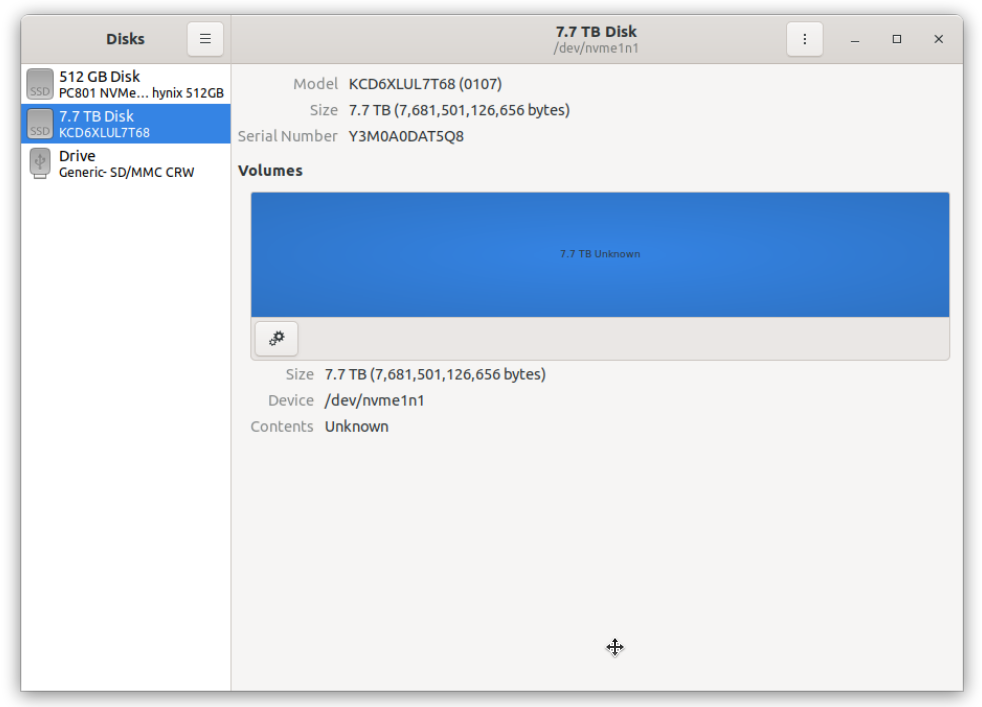
On the top 3 dots, click format Disk.
Quick.
Compatible with modern systems >2TB (GPT)
Click the + symbol to create a new partition
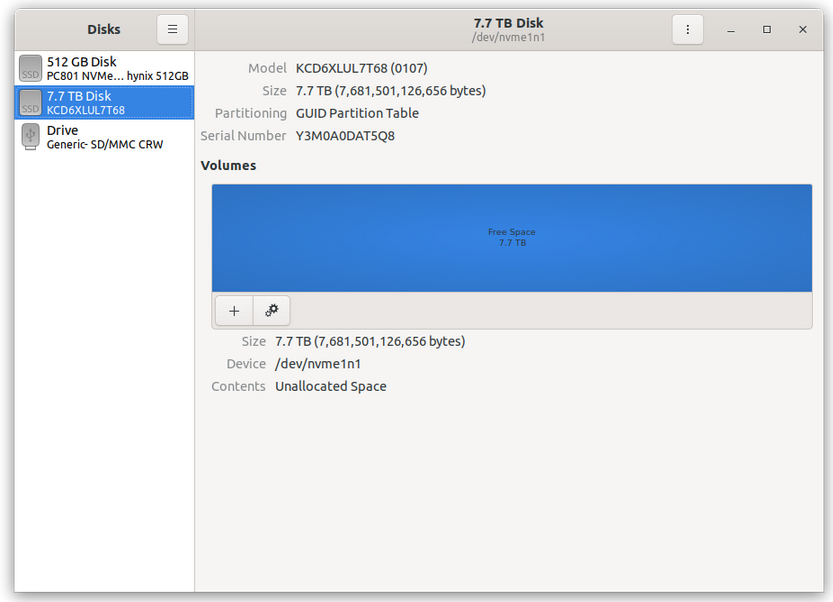
Once opened, you should see options to select the size of the new partition.
Select the partition size in accordance to the recommended size above.
There should be alot of “free space following the partition”.

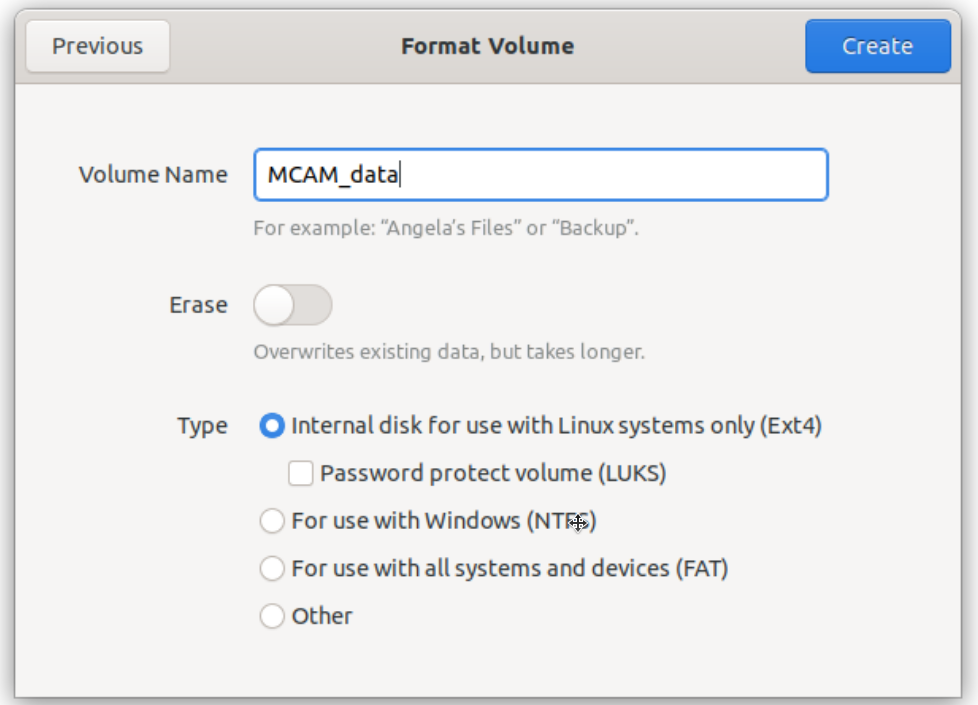
Give it the name MCAM_data
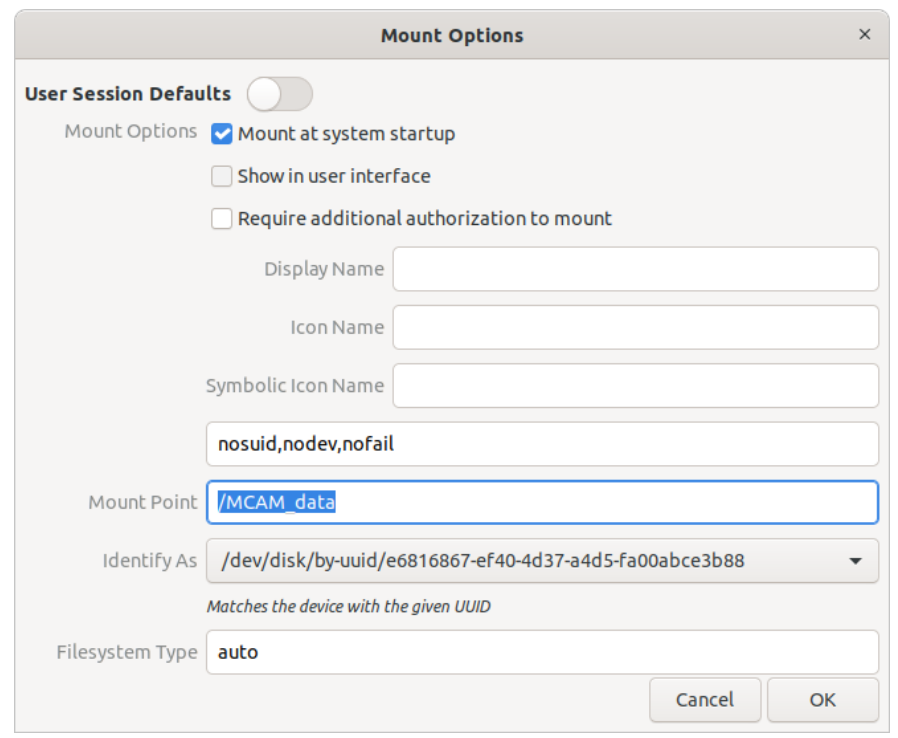
Once formatted, click on the 4TB partition, and click on the settings gear “Additional Partitions Options”
Change the following settings from their default values:
Uncheck Show in user interface
Set the mount point to /MCAM_data
Click OK when completed.
Click “Play” button. (This is only necessary as you’ve newly configured the drive. It should startup automatically).
Open the location.
Ensure that you can create a new folder in there. Call it test_for_new_ssd.
Restart your computer to ensure that the drive is mounted correctly.
Open the /MCAM_data location.
Ensure that the test_for_new_ssd folder is still there.
You may now delete the test_for_new_ssd folder.
Success. The drive is ready to be used!
USB vs Internal Storage Drives
Both Windows and Linux operating systems optimize for external storage drives differently than they do for internal storage. For writing live MCAM data, we suggest that an internal solid state drive be used, connected directly to SATA ports, or dedicated NVME lanes to the CPU.
Should you have any questions about how to optimize your hardware for use with the MCAM, do not hesitate to contact info@ramonaoptics.com.
Formatting an external USB drive as exFAT
When you need to move data off the MCAM computer using an external drive, such as a high performance USB disk, we recommend formatting that drive as exFAT. exFAT is readable and writable on Linux, Windows, and macOS, which makes it convenient for transferring data between systems.
Note
This recommendation applies only to external drives used to transfer
data. Internal drives used for live MCAM acquisition should be formatted as
ext4 following the Installing a new SSD instructions above. Do not
use exFAT for an internal data drive.
On Ubuntu, support for creating and formatting exFAT partitions is provided
by the exfatprogs package. Install it with:
sudo apt update
sudo apt install exfatprogs
Once exfatprogs is installed, format the drive with the GNOME Disks
utility, which is our preferred tool for this task:
Open the
Disksutility by searching for Disks in the application overview.Select the external device from the list on the left.
Delete any existing partitions on the device.
Click the + symbol to create a new partition.
When prompted for the filesystem type, choose Other, then select exFAT.
Confirm to format the partition.
Important
Format the partition, not the whole disk. In Disks, select the
partition (not the device) before choosing Other → exFAT as the
filesystem type. Formatting the partition this way completes without
error once exfatprogs is installed.
Data saving optimization
At Ramona Optics, we believe in sound scientific experiments. This means
keeping track of not only the acquired data, but also how it was
acquired. Natively, the data is stored as an xarray
Dataset.
Stills can be exported as a collection of images with a single metadata
file. While exporting images might not preserve all metadata correctly,
it can be useful to use the export functionality when working with other
pieces of software.
For exported data, the metadata.json files created with the
owl.mcam_data.save function provide the minimum metadata we believe
one should keep about their data.
Certain datasets can benefit from the use of optimized save and load routines.
In addition to the standard backends provided by xarray, Ramona supports
the use of the "ramona" backend in the load and save operations. This
backend is optimized for loading large datasets such as those generated by
videos or focal stacks.
To use the "ramona" engine backend, provide it as a parameter to the
function that load and save data.
Loading and saving speed of images
Many MCAM operations tend to be memory bound problems. The sheer size of the files ensures that data can usually be processed as fast as you can supply it to the processor. That said, the typical loading and saving operations will be done in a serial fashion.
While the MCAM acquires images, many libraries are either specifically
tuned for standard 3 color images, or unable to load the large datasets
generated by the MCAM. For example, a standard call to opencv’s
imread function will automatically produce a color-like image from
grayscale images generated by the MCAM. This can significantly increase
the memory requirement of the system (by a factor of 3!). For example a
grayscale image loaded with:
>>> cv2.imread('cam0_0.bmp').shape
(2432, 4320, 3)
Will produce a 30 MB dataset in RAM. The true size of the data, is a 2D grayscale image and should in most cases be read with:
>>> cv2.imread('cam0_0.bmp', cv2.IMREAD_UNCHANGED).shape
(2432, 4320)
The owl.mcam_data.load and owl.mcam_data.export attempt to
provide good defaults that can be used with the scientific data produced
by with the MCAM. They can also be used to load and save data from all
the micro-cameras in the array with a single function call. This avoids
the need to write many of the loops involved in loading and saving the
large datasets.
As an added bonus, they can also be used to lazily-load the data, allowing one to analyze image data-sets that are much larger than the system’s available RAM.
Setting up a Samba Drive on the MCAM computer
The MCAM computer can be configured to act as a Samba server. This allows one to access the data on the MCAM computer from other devices on the network. This is a useful feature if you want to access the data from a Windows computer or from an automated data pipeline.
It is recommended to always connect the MCAM computer to the networking using the same port on the MCAM Computer. Different ports are often treated differently by the network administrators.
We provide these instructions for convenience without any guarantee of security. Please consult your network administrator for best security practices.
Install samba
sudo apt update
sudo apt install samba
Create directory for Samba share. This step can typically be skipped for Ramona Optics supplied computers since this directory will already exist.
mkdir -p /MCAM_data
echo The current User and Group are: "${USER}:$(groups | cut -d ' ' -f 1)"
echo /MCAM_data reports that the current user and group are $(stat -c '%U:%G' /MCAM_data)
sudo chown -R ramona:ramona /MCAM_data
Edit Samba config and list the created
/MCAM_datadirectory
sudo nano /etc/samba/smb.conf
and add the following to the bottom
[MCAM_data]
    comment = MCAM Data Drive
    path = /MCAM_data
    read only = no
    browsable = yes
    public = yes
    create mask = 0660
    directory mask = 0770
    force user = ramona
Restart Samba service for the changes to take effect
sudo service smbd restart
Update firewall rules
sudo ufw allow samba
You should also verify locally that this setup was successful by trying to
connect to the local samba server with the MCAM computer’s file browser. The
Samba server can be reached by specifying the following below location in the
file browser. The browser should show the same files that are available in the
/MCAM_data directory.
smb://localhost/MCAM_data
Settings up a password for login. Your network security policies will disallow anonymous login to Samba servers. In this case, you will need to setup a password to enable the
ramonauser to access the samba server. This password is typically unrelated to the login username and password. Without setting this password, most clients will attempt to fallback to passwordless (or anonymous) login. To change the password to the samba use the command
sudo smbpasswd -a ramona
Connecting to Samba server from Windows
Open File Explorer from the taskbar or by pressing the Windows logo key + E.
Select This PC from the left pane. Then, on the File Explorer ribbon, select More > Map Network Drive.
Pick a letter and enter
\\<ip-address>\MCAM_datain the Map Network Drive dialog
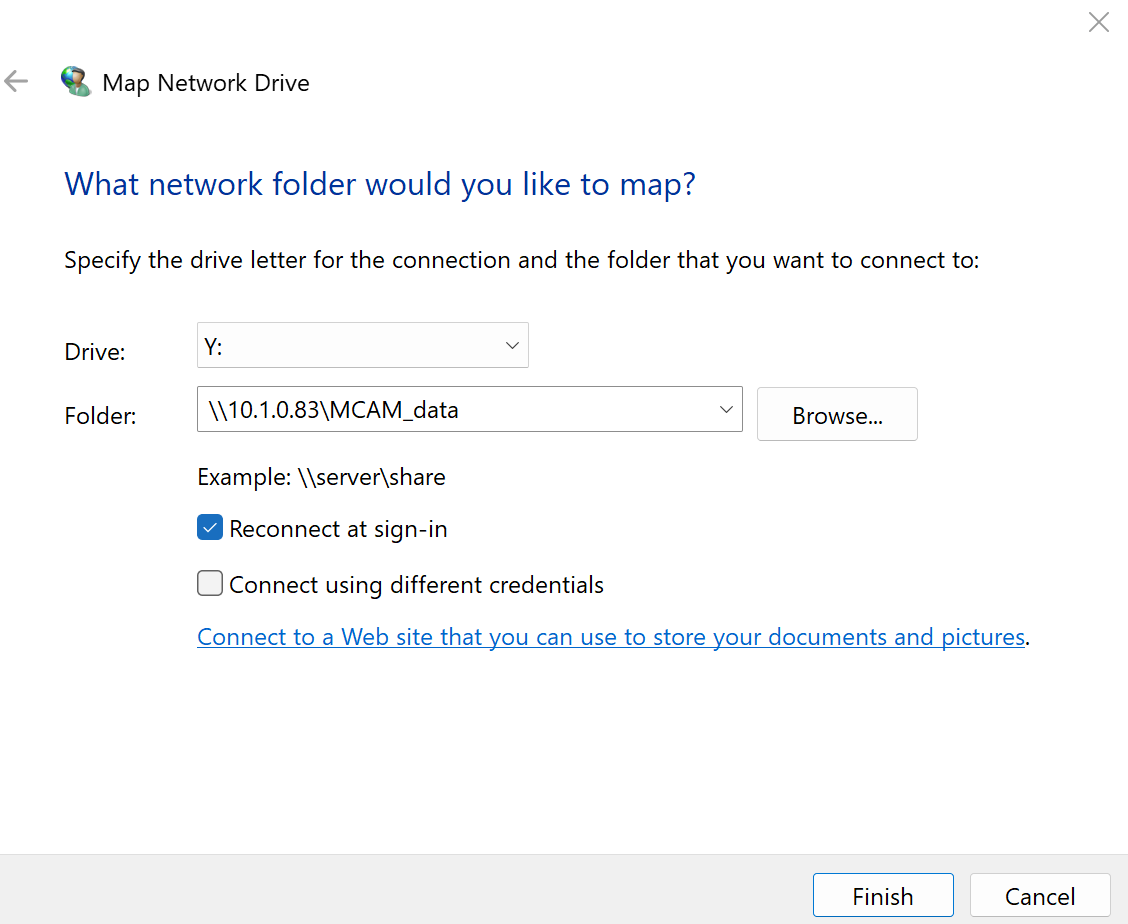
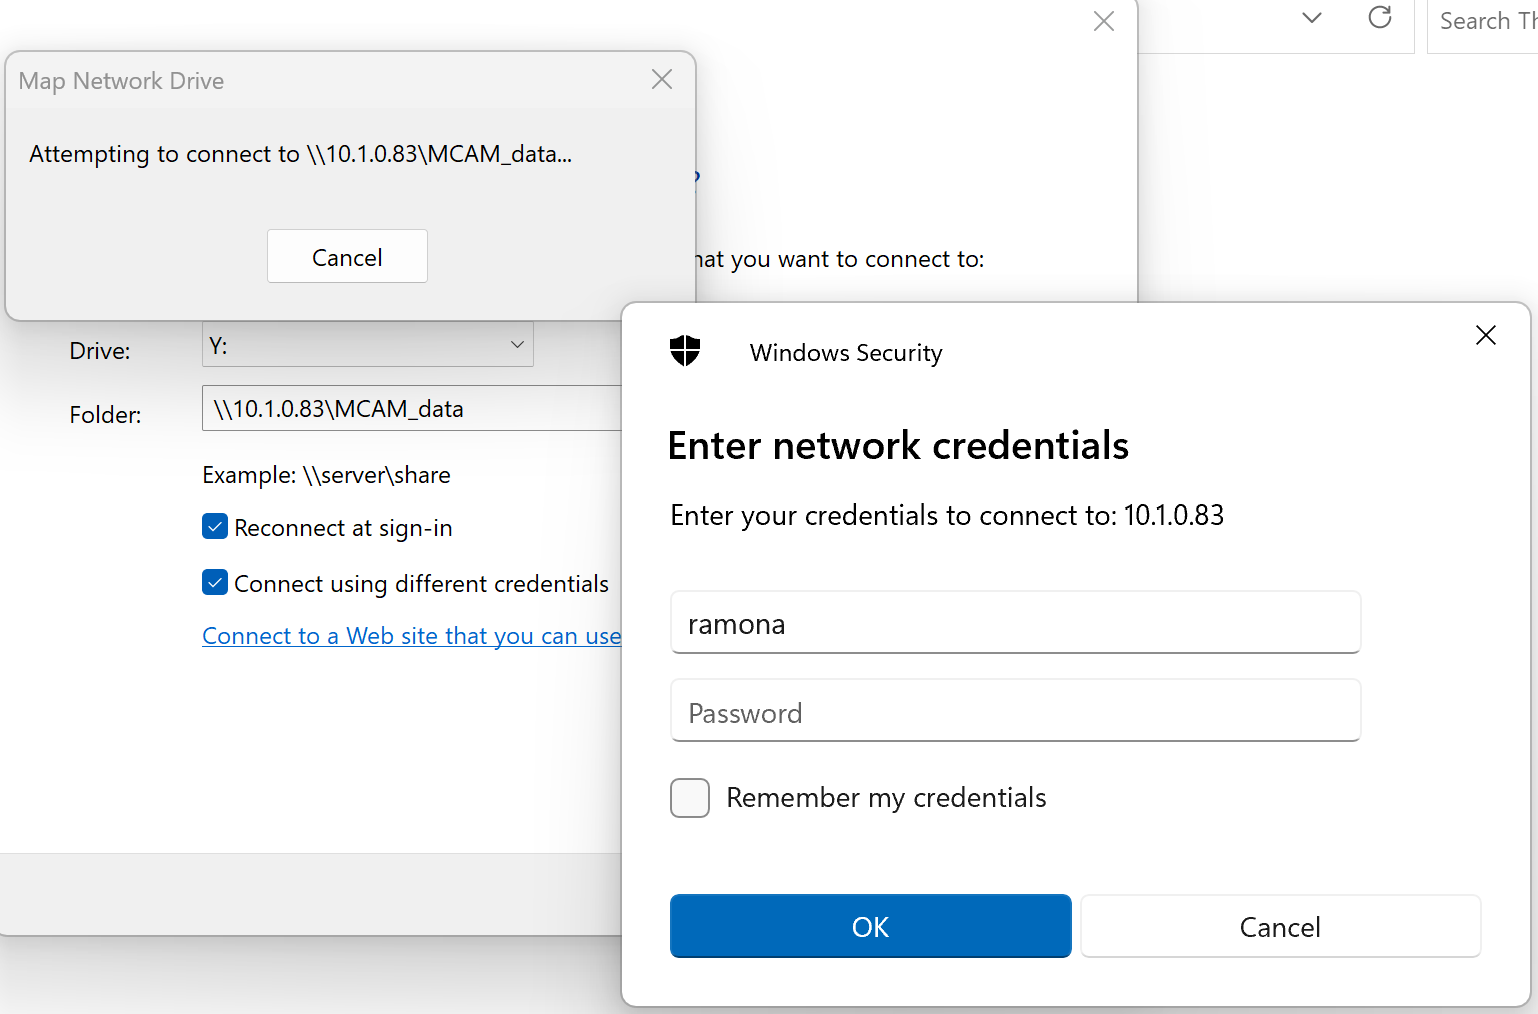
If guest / anonymous access is disabled by your organization, connect using credentials.
This is the same username and password that you use to log into the MCAM computer.
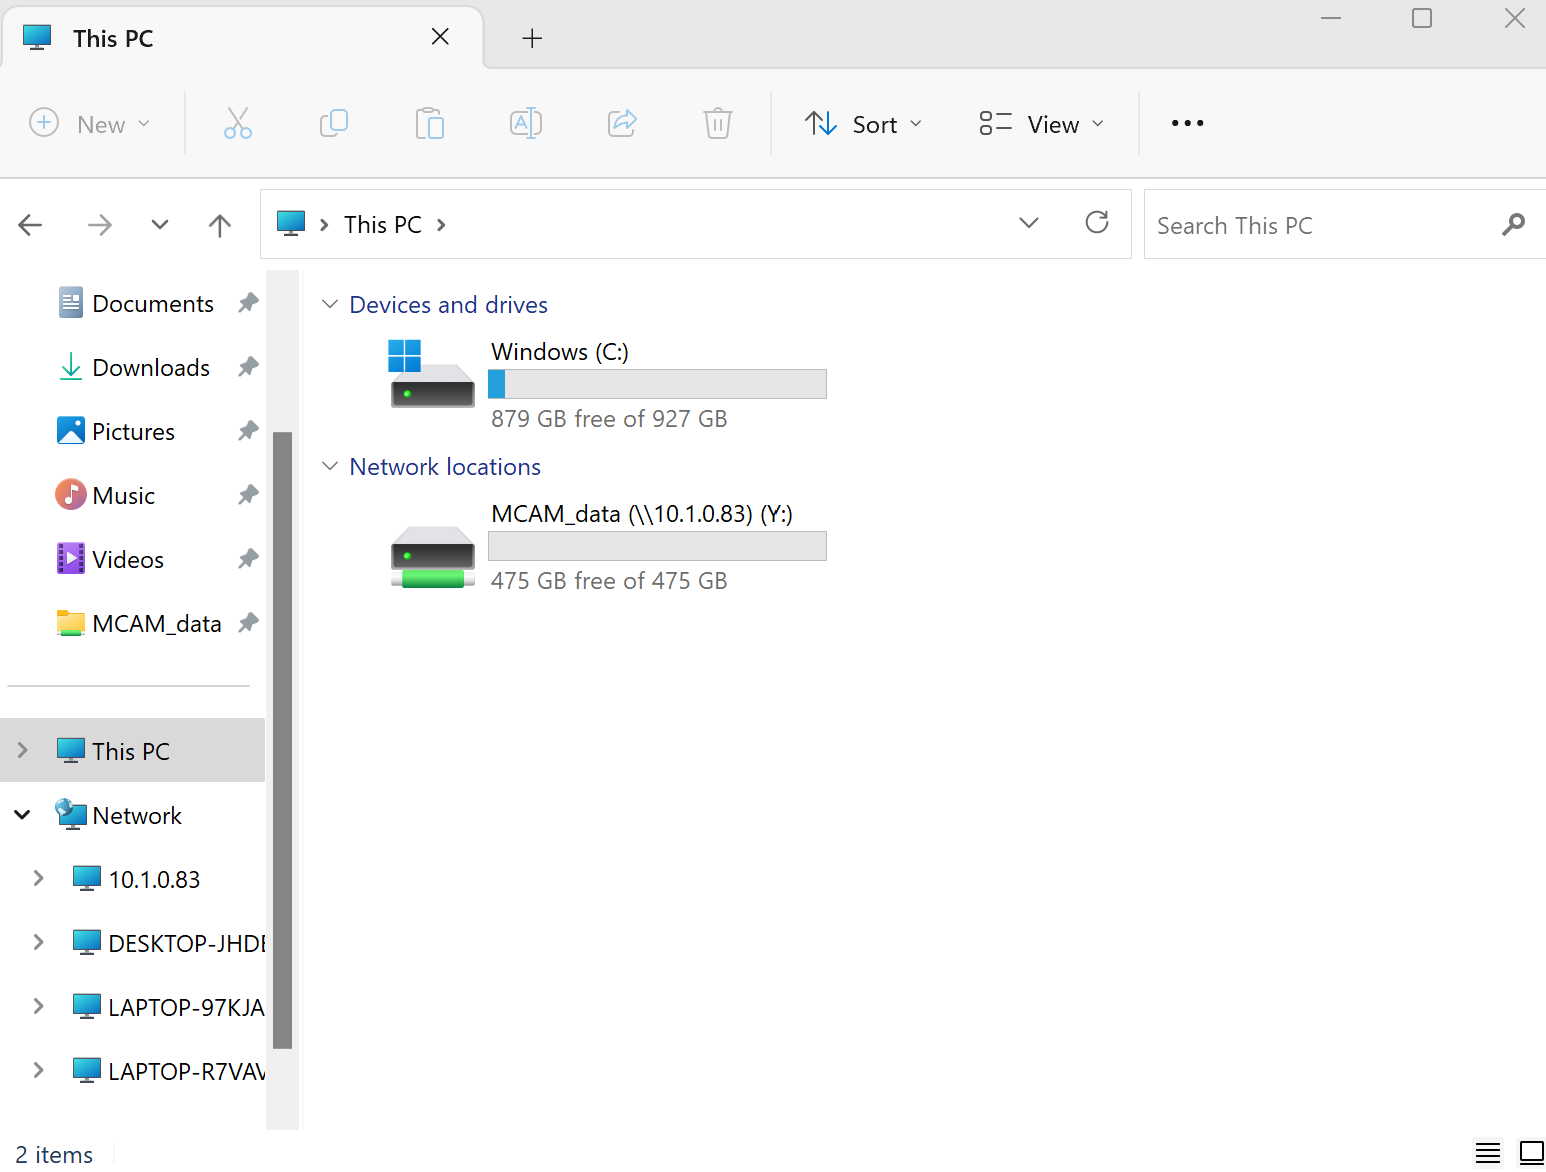
The drive should now be listed in This PC
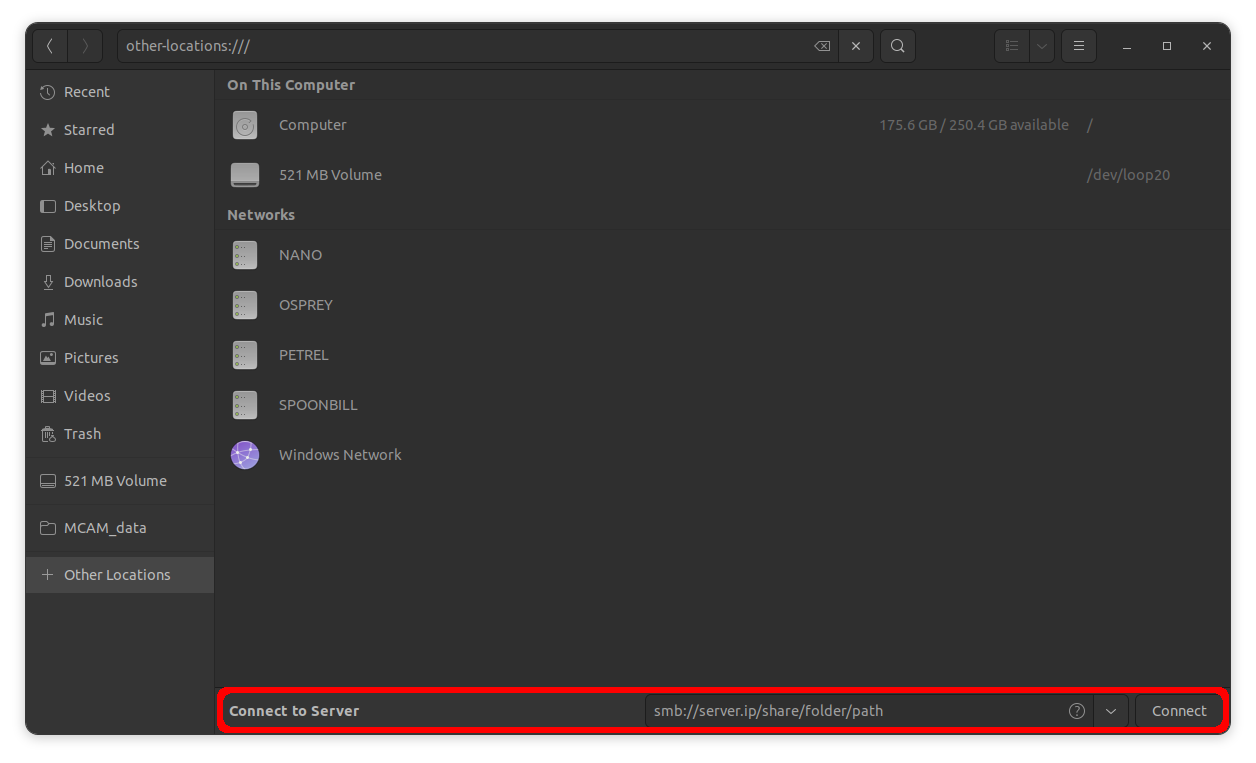
Connecting to Samba server from Linux
Connect to SMB server
sudo apt install smbclient
In the file explorer type Ctrl + L and enter
smb://<ip.address>/MCAM_data
Creating a persistent mount to the Samba server from Linux
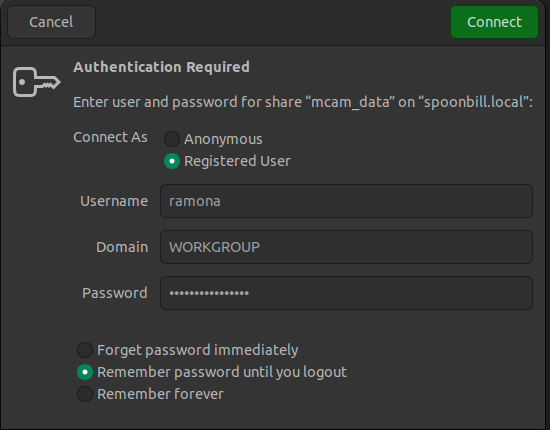
Connect to SMB server and input your credentials when prompted.
This will save them into Gnome Keyring for future use.
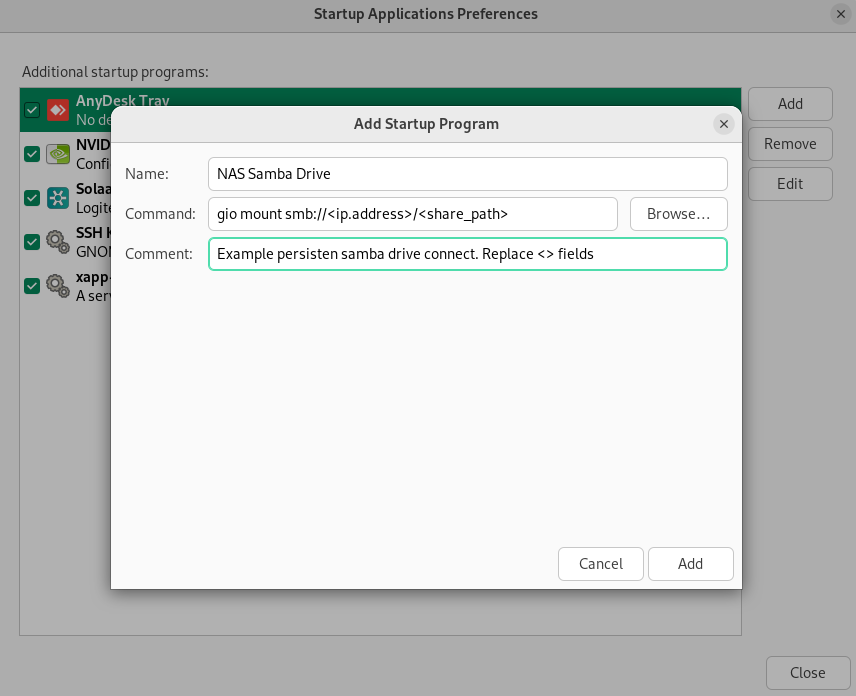
Open “Startup Applications Preferences” from the application menu
Click on “Add”
In the command field, enter the following command replacing the server IP and share information with your own
gio mount smb://<ip.address>/<share_path>
Data Management Tips
As with any imaging device, the MCAM generates a large amount of data. Here we outline 5 different techniques that you can use to manage your data.
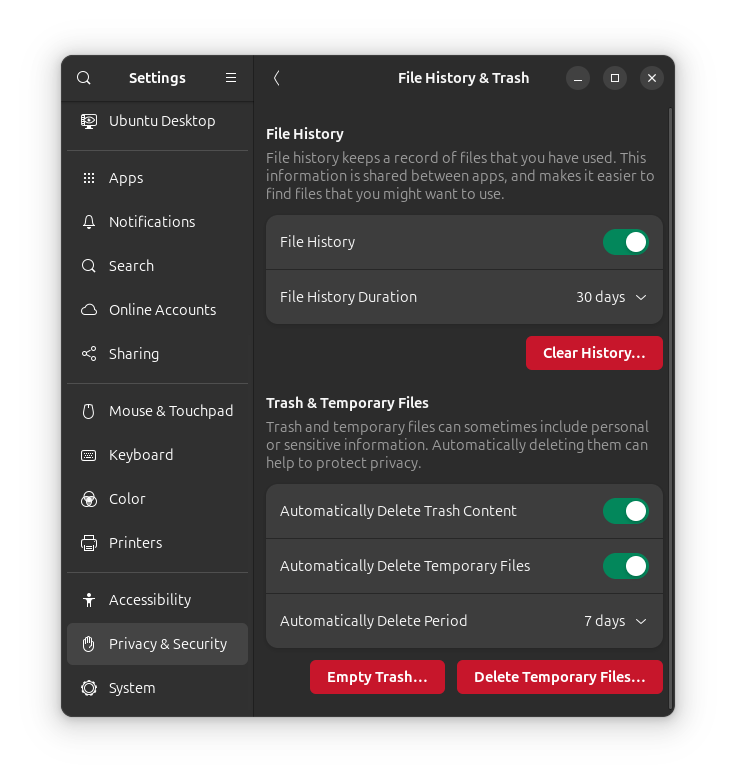
Empty the Trash Bin
Often, many files are left over in the trash bin. Its always good to check if
anything is in there and pruge it periodically. To have this done automatically, you
can open the File History & Trash settings in Ubuntu and set the trash bin
to empty automatically as shown in the image below.
Visualize What Files are the Largest
Often focusing on the largest files can have the most benefit. During the
exploration phase of using a new imaging device, it is often useful to
experiment with different imaging parameters until the most appropriate one is
found. This can lead to a large number of files being generated. To find the
largest files, we recommend you use the Disk Usage Analyzer tool that is
included with Ubuntu. This tool will allow you to quickly identify the largest
using some neat visualizations. To start, press on the Ubuntu Logo on the lower
left hand corner of the screen and type in Disk Usage Analyzer. Press enter
to start the application.

Once the application is started, you will want to scan a custom folder. You’ll
want to scan the /MCAM_data folder as this is where the high performance
SSD is typically mounted.
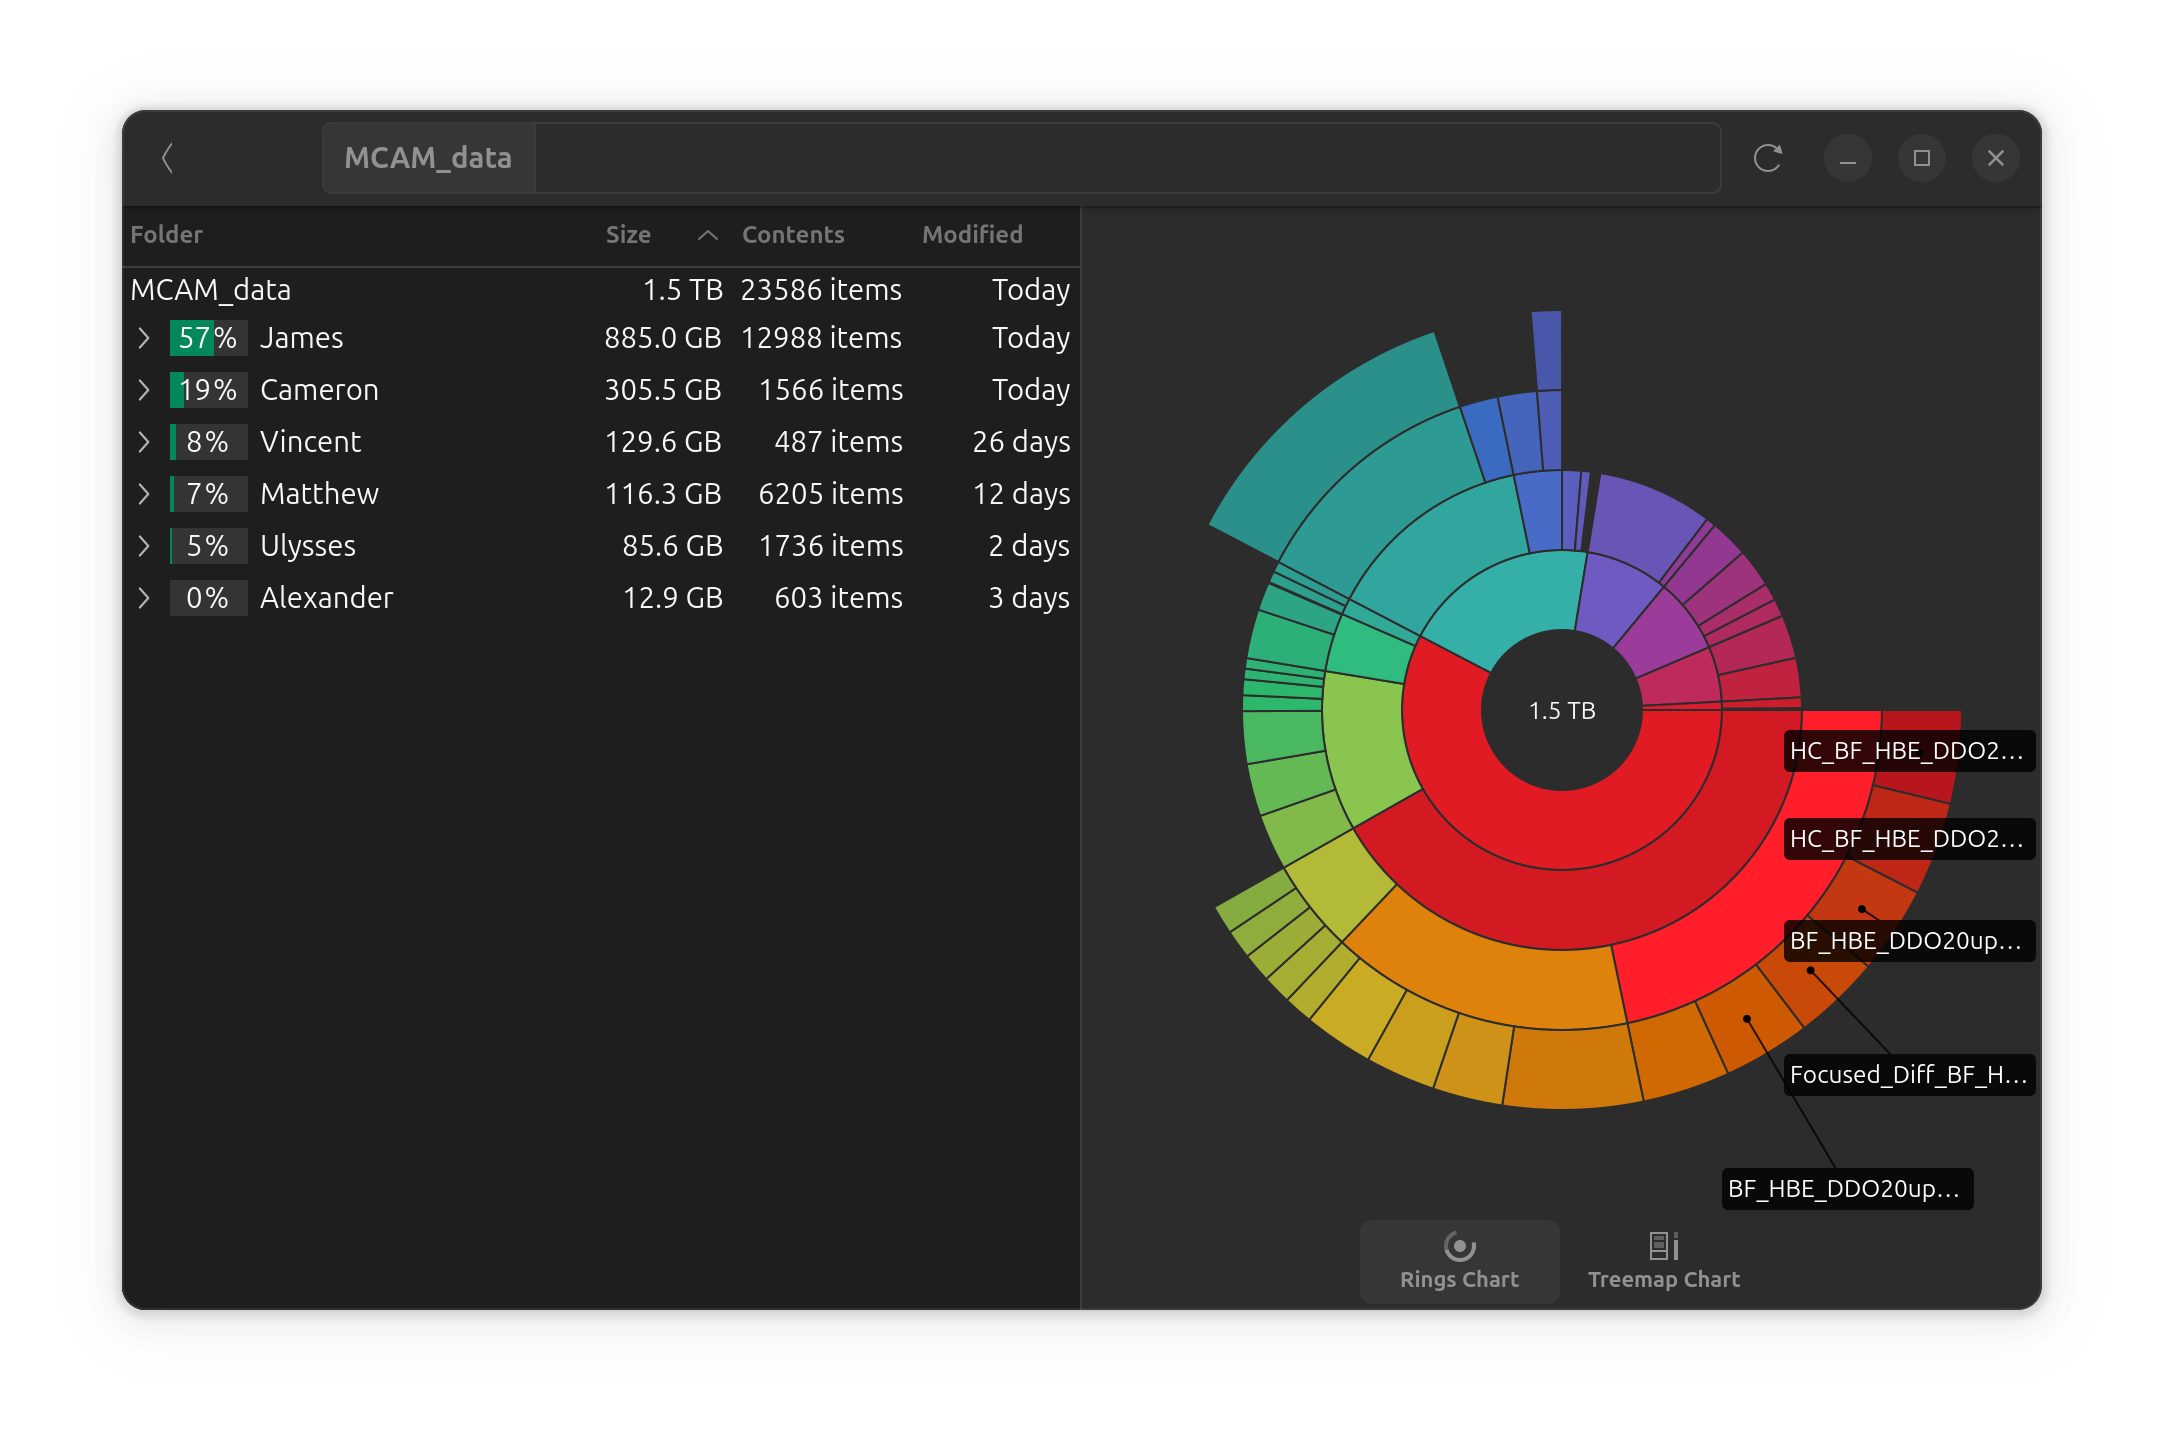
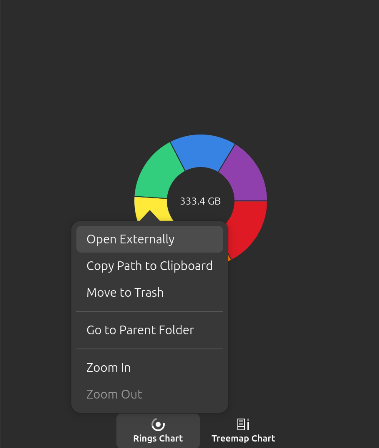
The pie chart visualization can be useful to quickly identify the largest
folders. In the example above, we can see that that there is a large amount of
data being used by a user called James. You can click on any part of the pie
chart to focus the visualization on that folder. To open the folder externally,
right click on the portion of the Pie Chart of interest and select Open
Externally.
You can use this to identify and delete any data that is no longer relevant.
Compress Brightfield Video Datasets
While saving data in the .NC format is useful for preserving the raw data,
brightfield video data acquired for behavioral analysis can be readily
compressed. In fact, our 8 keypoint tracking algorithm works best with
compressed brightfield data. To compress your video data, follow the
instructions laid out in our MCAM Workflows Manual <./pdfs/MCAM Workflows Manual.pdf>.
Typically, we’ve found that a 10-20x compression factor can be obtained!!!!
Delete Unnecessary Data From Well Plate Acquisitions
When volumetric scans are acquired with the MCAM and saved with the TIFF
format, individual images can be deleted from the acquisition. Delete any wells
that are not needed (often these are wells that are completely empty!!!!). For
example, if a scan of a 96 well plate does not contain the wells in the outer
perimeter (36 wells!!), this can accumulate to an extra 37% of data that is
not needed. This can be done by using the nautilus file browser that is
included with Ubuntu.
Navigate to where you saved your acquisition, and simply start typing to search
for images that are not needed. For example, to delete all of row A, you can
search for well_A and you will find all of the images that are in row A.
Once you are in the directory of the acquisition just type well_A.
You can then select all the images and delete them. This can be repeated for as
many rows or columns that you wish to delete.
Use a Network Attached Storage
All MCAM Acquisition workstations are equipped with at least 4 TB of usable high performance storage. However, this can be easily exceeded once multiple users start to use the system for their experiments. In this case, we recommend using a Network Attached Storage (NAS) to store the data. We recommend at least 20 TB of redundant storage. This can be accomplished with a 4 bay NAS with 8~TB drives in a RAID 5 configuration. For users that expect to generate a large amount of data, we recommend a 8 bay NAS with 16 TB drives. Depending on the RAID configuration, this can provide up to 96 TB of redundant storage.
We recommend that the NAS be configured to share the data using the SMB protocol. We recommend users refer to Creating a persistent mount to the Samba server from Linux to learn how to mount the NAS on the MCAM computer.
Network Attached Storage without the lab wide network
Based on your lab’s security policies, it might be necessary to connect the MCAM Workstation to a network attached storage without access to the lab wide local area network (LAN). This may be the case while you are waiting for networking ports to become live in your lab, or for other security reasons.
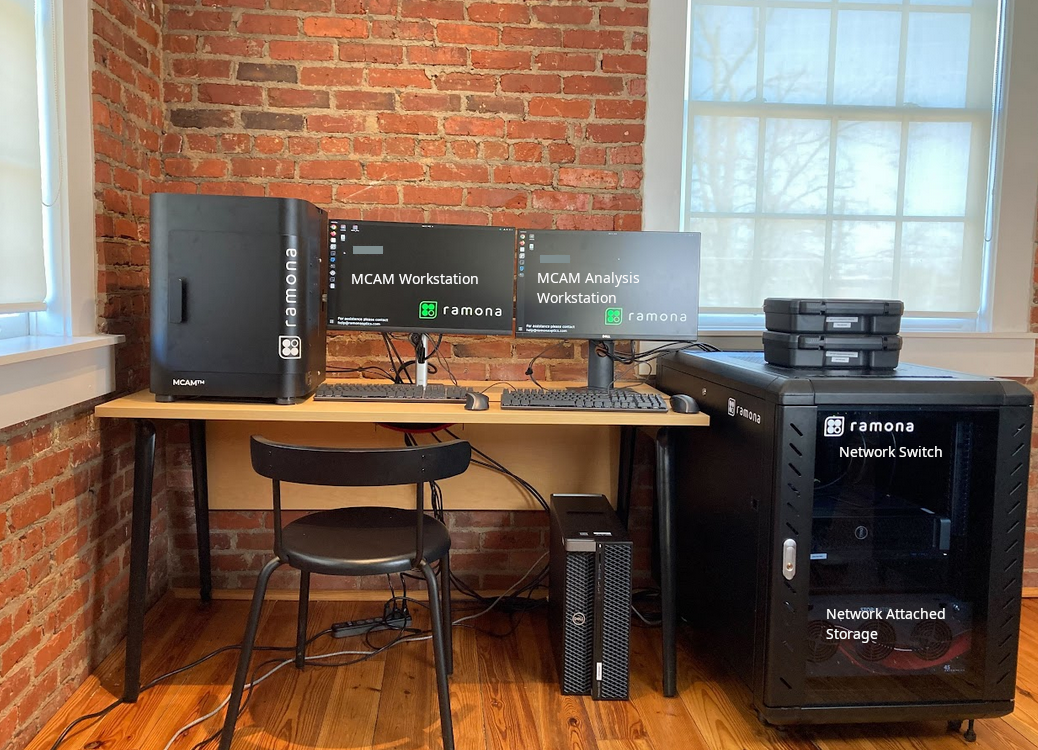
A typical configuration of a multi-workstations setup with a NAS, shown in the figure below, consists of the following:
The MCAM Workstation (Left)
A network attached storage device (NAS) (Lower right)
Potentionally one or more MCAM Analysis Workstations (Right)
A high speed switch to connect the devices locally. This dedicated network switch ensures that traffic between the MCAM and the NAS is not slowed down by other network traffic in your lab. (Located inside the network closet)
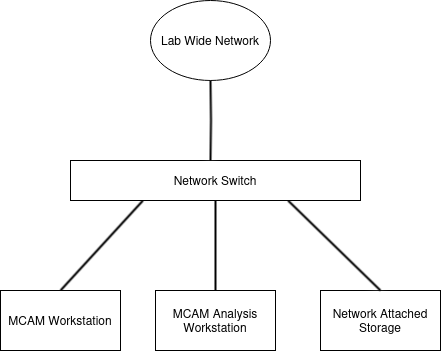
Connecting the switch to the lab LANs enables computers beyond the MCAM supplied Workstation to access the shared files. However, in the case where the lab LAN is not available, and this connection is absent, IP Addresses will not be assigned automatically.
In this case, Ramona recommends ensuring that the switch is physically disconnected from the rest of the lab network and to connect it to a LAN port of a typical off the shelf router as shown in the network diagram below with a network cable. The off the shelf router, often without any configuration, will act as a DHCP server and assign IP addresses to the devices connected to the switch.
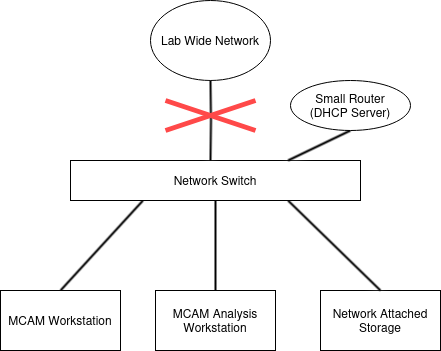
To identify the “LAN” port on the router, look for a port that is labeled “LAN” or “Ethernet”. This port is typically different from the “WAN” (Wide area network) port that is often given a “unique” color on the back of the appliance.
In the figure below, the LAN ports are orange, and the WAN port is blue.
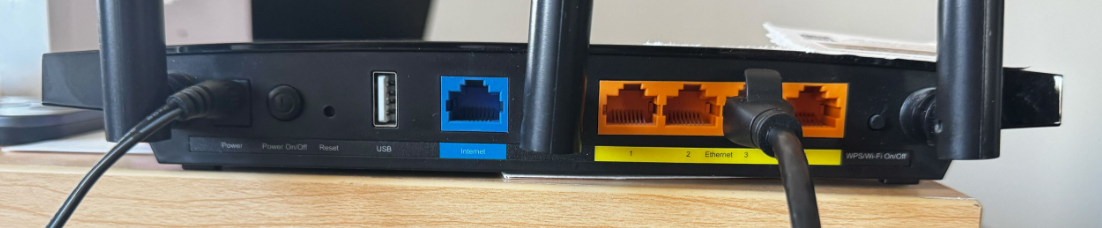
With the router in place, and powered on, it should assign IP addresses to the devices connected to the switch. The operating system may complain that there is not “Internet access”. This is expected because the router is not connected to the internet. This is not a problem for the MCAM Workstation and the NAS device since they are connected in the small network we created.
You should be able to access the devices by using their IP address or through
the friendly names of the MCAM Workstations and the NAS devices. The IP
address (IPv4) is a group of 4 numbers seperated by periods such as
192.168.1.242 (this number may be different for your setups). The friendly
names are often kestrel0XXX.local or vireo1XXX.local where the XXX
represents the serial number of your MCAM Workstation. To find your IP
Address, you may follow the instruction in the Ubuntu Knowledge Base.
This kind of configuration is often referred to as an “airgapped network” since the MCAM Workstation and the NAS are connected to each other, but not to the internet or the lab network. You may, at your discretion, read through the instructions provided with the off the shelf router to configure the following settings:
Disabling the WiFi network so as to avoid interference with other WiFi networks in your lab.
Assign static IP addresses to the MCAM Workstation and the NAS device so as to avoid the DHCP server assigning different IP addresses to the devices each time they are powered on.
Updating Ubuntu
Ramona Optics recommends that you keep your MCAM Workstation up to date with the latest Long Term Support (LTS) Release of Ubuntu. At the time of writing, this is version 24.04. We do not recommend non-LTS versions of Ubuntu such as 24.10, 25.04, or 25.10. While we do not have a set rule for when to upgrade to the latest LTS version, we typically recommend that you upgrade to the LTS release about 8 months after it is released. This ensures that the LTS version has had time to be tested with the MCAM and that any issues have been resovled by our software team.
January 2025: Recommendation to upgrade to Ubuntu 24.04 LTS
January 2027: Anticipated recommendation to upgrade to Ubuntu 26.04 LTS.
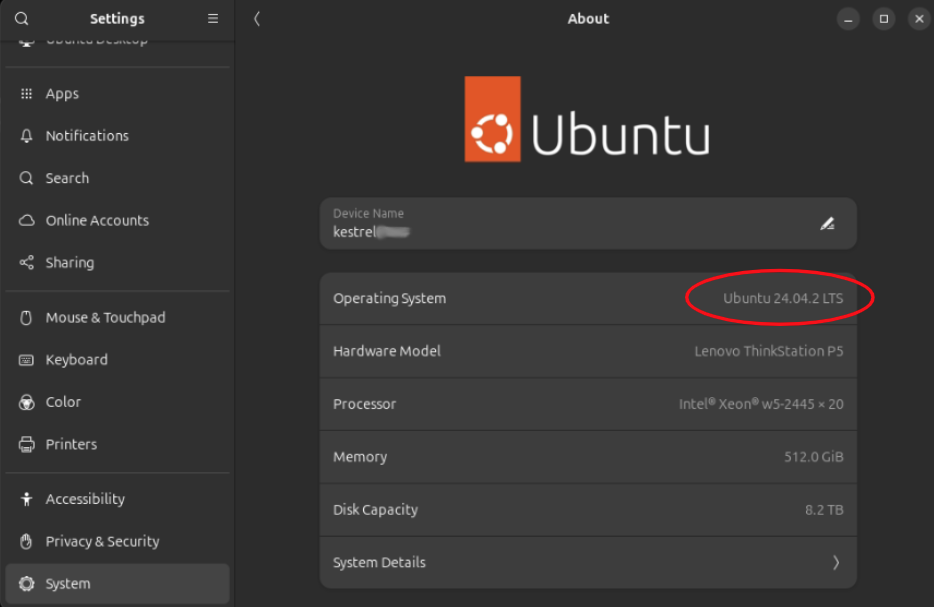
Identifying your Ubuntu version
To identify your Ubuntu version, search for “About” in the application overview. Once opened, the version of Ubuntu is shown as the “Operating System” encircled in red in the image below.
If you are using:
Ubuntu 24.04: Recommendation to perform regular Ubuntu updates as prompted by the Software Update.
Ubuntu 22.04: We recommend that you consider upgrading to Ubuntu 24.04. However, it is not required at this time.
Ubuntu 20.04: We recommend that you upgrade to Ubuntu 24.04.
Before upgrading from one version of Ubuntu to an other, we recommend that you contact Ramona Optics.
Linux kernel compatibility
The MCAM driver can be found on our Ubuntu ppa and installed on Ubuntu 20.04, 22.04, and 24.04. To date, we have tested with linux kernel versions 5.4 through 6.14. Each MCAM Workstation is pre-configured to keep the last three (3) versions of the kernel installed. This is done to ensure that in the case that a new kernel update is incompatible with the MCAM, the previous kernel can be used.
Performing an Ubuntu Upgrade
As of version MCAM Version 0.19.247 released on April 28, 2025, users of Ubuntu 20.04 will receive a warning that they should update their system installation. We recommend Ubuntu 24.04 since it provides important improvements to compatibility with external solid state drives (SSDs) used to transfer data from the MCAM.
We recommend that you contact a Ramona Optics representative before upgrading your system. The upgrade process can take up to 3 hours with a fast internet connection and as such we recommend that you reserve the MCAM for half a day to complete the upgrade process.
Prior to starting the upgrade process, we recommend that you backup your data and configuration files. You will need an internet connection to complete the upgrade process.
Prepare for the Upgrade
This phase is expected to take up to 1 hour and can be completed without the presence of a Ramona Optics representative.
30 minutes: Ensure that your system has the latest updates installed for the current version of Ubuntu.
sudo apt update
sudo apt upgrade --yes
sudo apt autoremove --yes
2 minutes: Restart the MCAM Workstation.
2 minutes: Ensure that the MCAM Workstation can continue to connect to the MCAM by starting up the Ramona Software.
Perform the Ubuntu Upgrade
This phase can take up to 2 hours to completed. It is recommended to complete the following steps below with a Ramona Optics representative.
2 minutes: Close all instantances fo the MCAM Software.
2 minutes: Power off the MCAM, but leave the MCAM workstation powered on.
90 minutes: Run the following command to upgrade your system to the latest version of Ubuntu. Follow the instructions on the screen to complete the upgrade.
sudo do-release-upgrade --allow-third-party
2 minutes: Reconfigure the system to be optimized for usage with the MCAM.
sudo add-apt-repository --yes ppa:ramonaoptics/ppa
sudo apt install qdma-pf-dkms dma-ctl ramona-teensy-udev drop-caches

# Configure GRUB to show all the kernels easily with a 3 second timeout
sudo sed -i '/^GRUB_TIMEOUT_STYLE/s/hidden/menu/' /etc/default/grub
sudo sed -i '/^GRUB_TIMEOUT/s/=0/=3/' /etc/default/grub
if [[ ! $(grep "^GRUB_DISABLE_SUBMENU=y" /etc/default/grub) ]]; then
    echo "GRUB_DISABLE_SUBMENU=y" | sudo tee -a /etc/default/grub
else
    echo "Submenu already disabled, nothing to do"
fi


# "Increasing file descriptor limits."
sudo sed -i -E 's/^#?DefaultLimitNOFILE=*/DefaultLimitNOFILE=65535/' /etc/systemd/user.conf
sudo sed -i -E 's/^#?DefaultLimitNOFILE=.*:/DefaultLimitNOFILE=65535:/' /etc/systemd/system.conf

sudo tee -a /etc/security/limits.conf <<EOF
* hard nofile 65535
* soft nofile 65535
EOF

echo "session required pam_limits.so" | sudo tee -a /etc/pam.d/common-session
echo "session required pam_limits.so" | sudo tee -a /etc/pam.d/common-session-noninteractive
2 minutes: Restart the MCAM Workstation.
- 5 minutes: Perform a “cold boot” test procedure:
Power off the MCAM Workstation.
Unplug the power cord from the wall for the MCAM Workstation.
Wait 10 seconds
Power on the MCAM (but not the MCAM Workstation).
Wait 10 seconds
Plug the MCAM Workstation power cord back into the wall.
Wait 10 seconds
Power on the MCAM Workstation.
2 minutes: Start the Ramona Software and ensure that the MCAM is connected.
Local Accounts vs LDAP/SSSD Configuration
The MCAM Workstation is pre-configured with a single user account called
ramona. This account is used to run the MCAM software and to store the data
acquired by the MCAM.
We do not recommend using LDAP or SSSD configuration for the MCAM Workstation as this may make the MCAM Workstation unusable in the case of any network issues. It will also make it more challenging for the Ramona Optics team to provide support for the MCAM Workstation.
Firewall and Anti-virus Configuration
The MCAM workstation is not configured with a firewall or anti-virus software. This is to ensure optimal performance of the MCAM acquisition and analysis software. We do not recommend installing any firewall or anti-virus software on the MCAM Workstation as it may interfere with the performance of the system. Many users make use of an external firewall ensuring that the MCAM’s performance is not affected.
At the very least, we require the following websites to be accessible to the MCAM Workstation to enable software updates (both http and https protocols):
Ramona Optics Website for Documentation: docs.ramonaoptics.com
Operating System Updates (Ubuntu Updates)
Ramona MCAM Software Updates:
Anydesk specifically requires the clients to use the TCP-Ports: 80, 443, and 6568. Please see Anydesk’s Documentation for more information.
Administrator Account Settings
By default, Ramona’s systems are delivered with a single user account called ramona. The MCAM software is installed in a user specific directory in order to update it independently from the operating system. For simplicity, the account is also made to be an Ubuntu administrator account. This provides the Ramona support team with the ability to troubleshoot system configuration challenges that may arise.
If your IT policies require the use of a different administrator account, you may create a new administrator account and provide the Ramona support team with the credentials (username and password) to this new account.
Without the credentials, our ability to help you troubleshoot issues will be severely limited, and may impact our ability to provide timely support.
To create a separate administrator account:
Follow these instructions to create a new user on Ubuntu https://help.ubuntu.com/stable/ubuntu-help/user-add.html. * Ensure you select the option to make the new user an administrator. * We recommend all lowercase letters for the username without any spaces or special characters. * Unless your IT policies recommend otherwise, we recommend the username admin. * Write down the username and password of the new account in a secure location. * Share the administrator username and password with the Ramona team to ensure smooth future support.
Logout of the ramona account.
Login to the new administrator account (e.g. admin).
Open the user settings by searching for “Users” in the application overview.
Click on the ramona user account.
Toggle the “Administrator” switch to off.
Logout of the new administrator account.
Login to the ramona account to continue using the MCAM software as normal.